How to Make a Stage Plot: Step-by-Step Guide for Bands
Learn how to build a professional stage plot and input list from scratch. This step-by-step guide covers every element — performer positions, backline, monitors, power, mics, DI boxes, and the input list — so your next load-in goes smoother. Includes a free downloadable input list reference sheet.
A great stage plot is one of the most important documents a working musician can have — and one of the most misunderstood. Show up to a venue without one, or hand over a sloppy, outdated one, and you've already started your night on the wrong foot. The engineers and production staff who receive your advance documents are making decisions about your show before you ever walk through the door. A professional, accurate stage plot tells them you're organized, you know your setup, and you respect their time. That reputation compounds quickly.
The good news is that making a truly great stage plot isn't complicated once you know exactly what needs to go on it — and that's exactly what this guide covers.
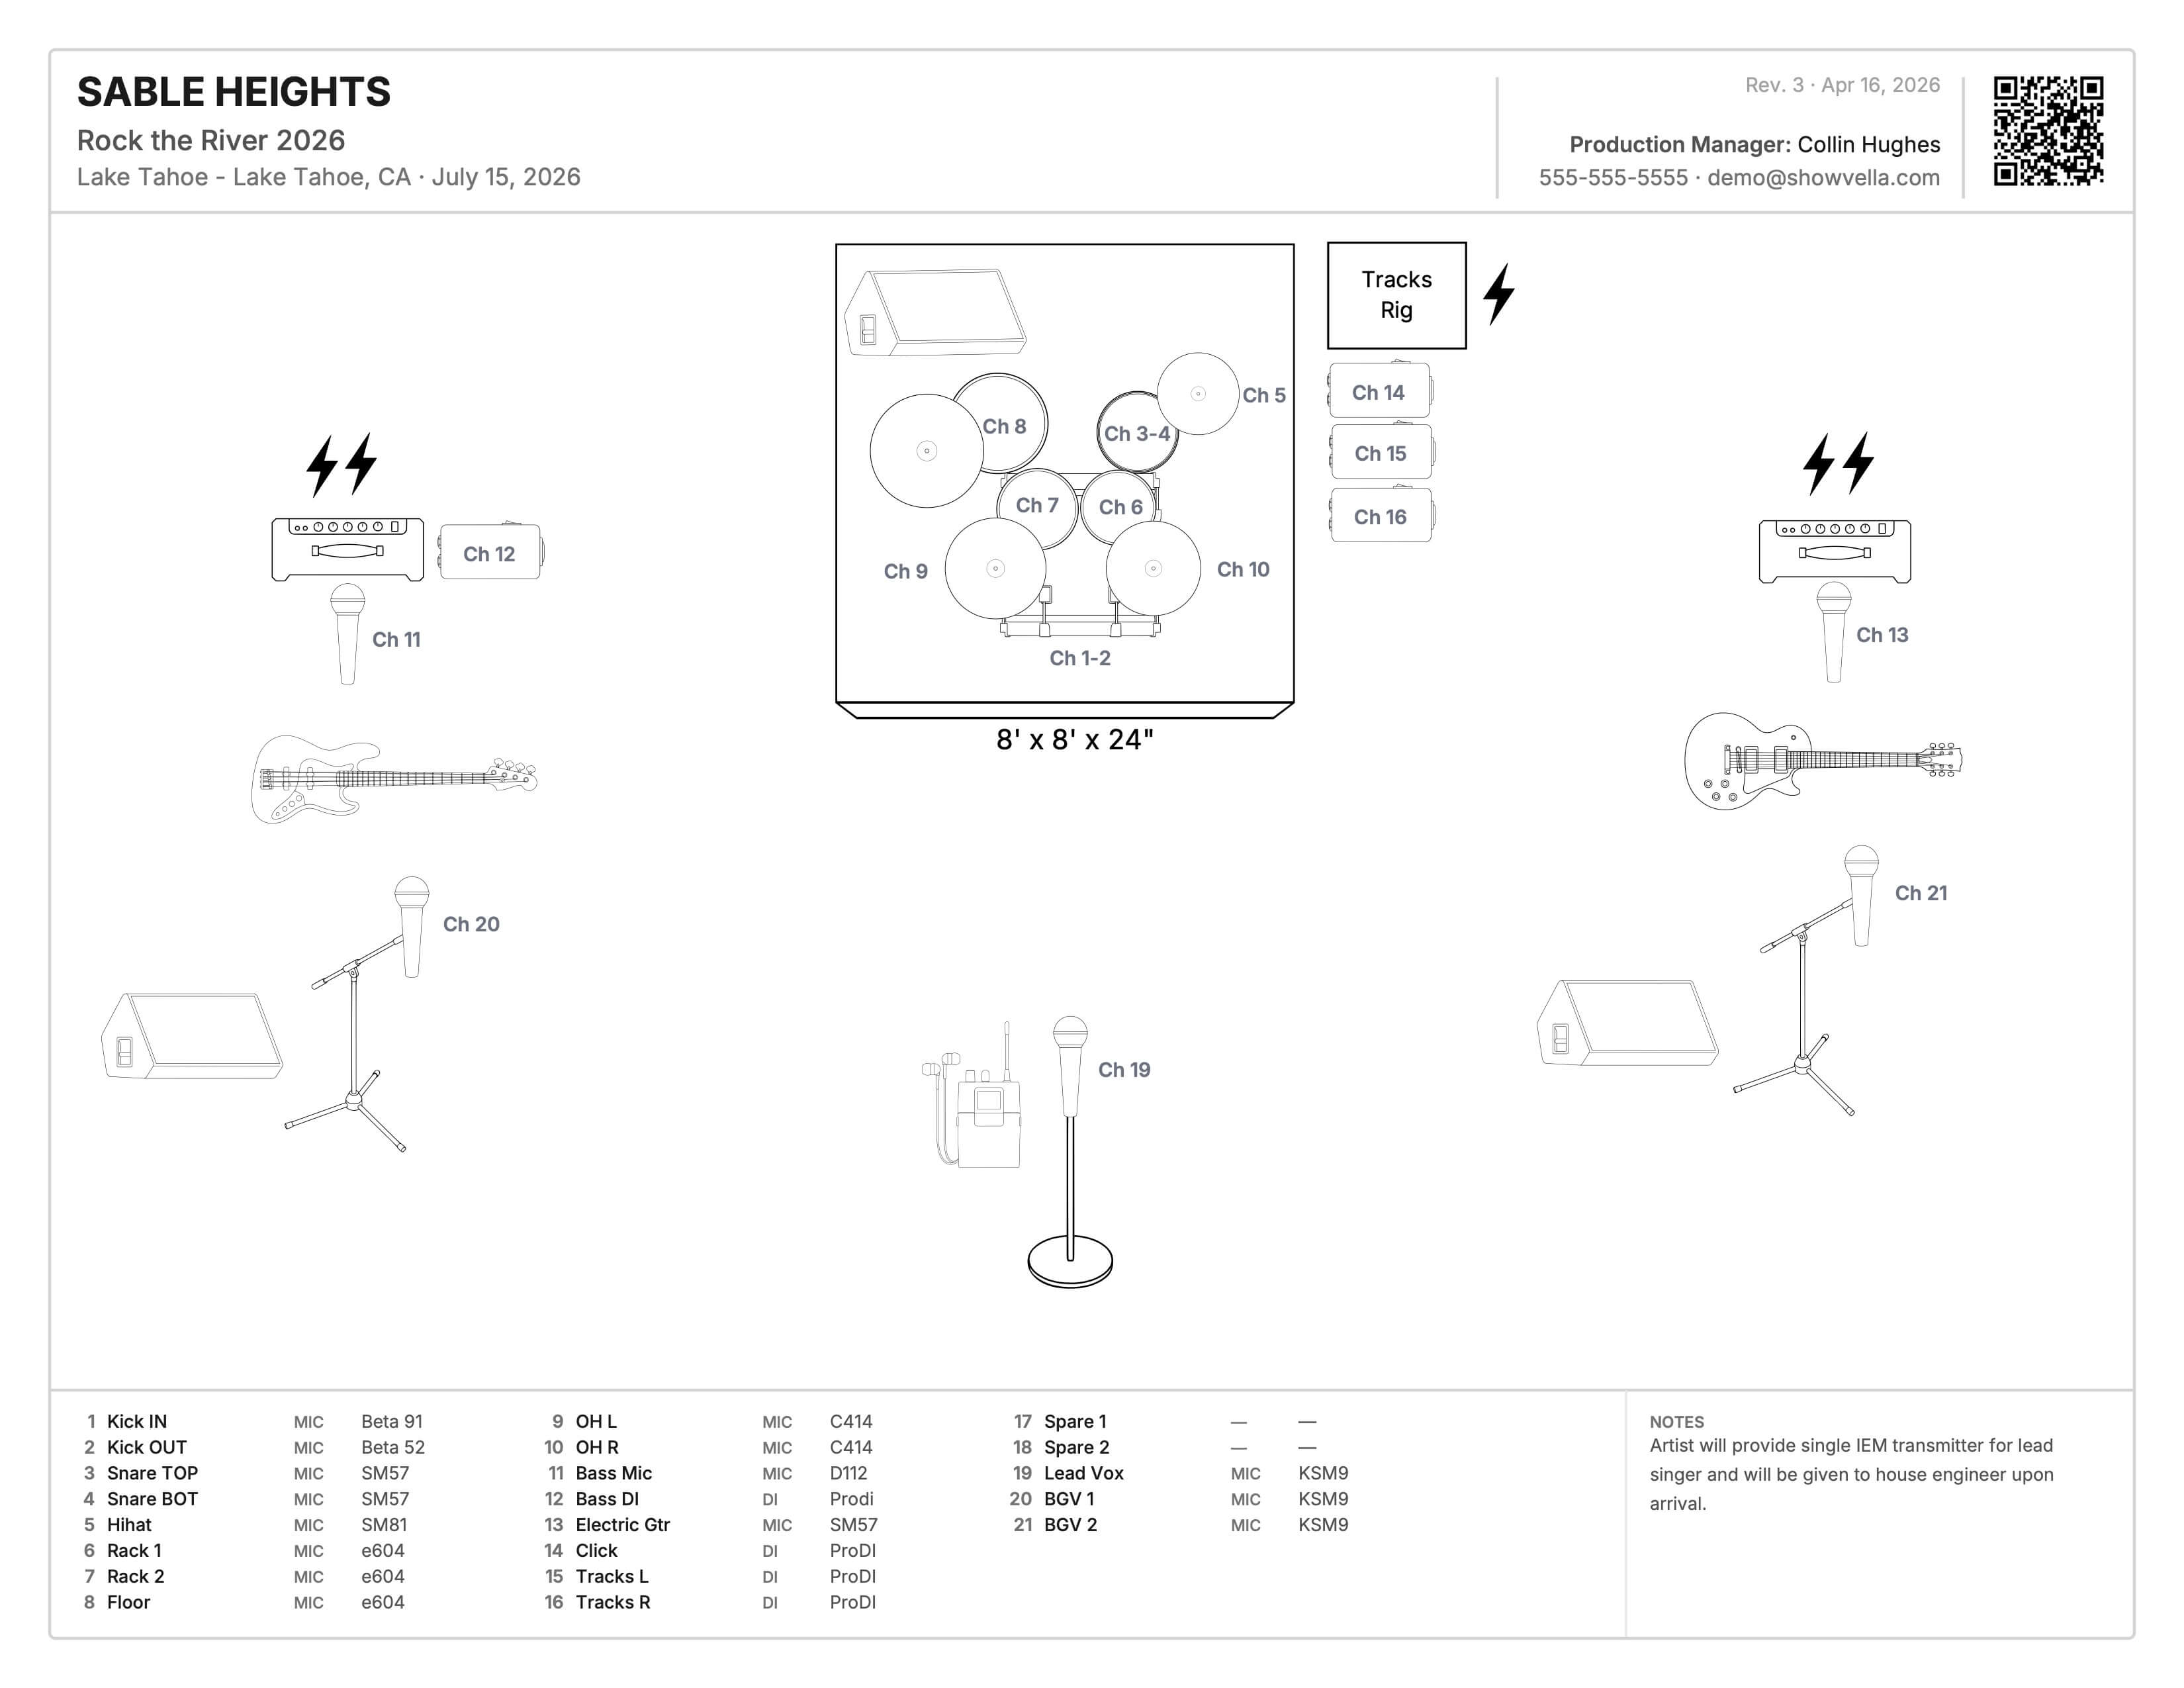
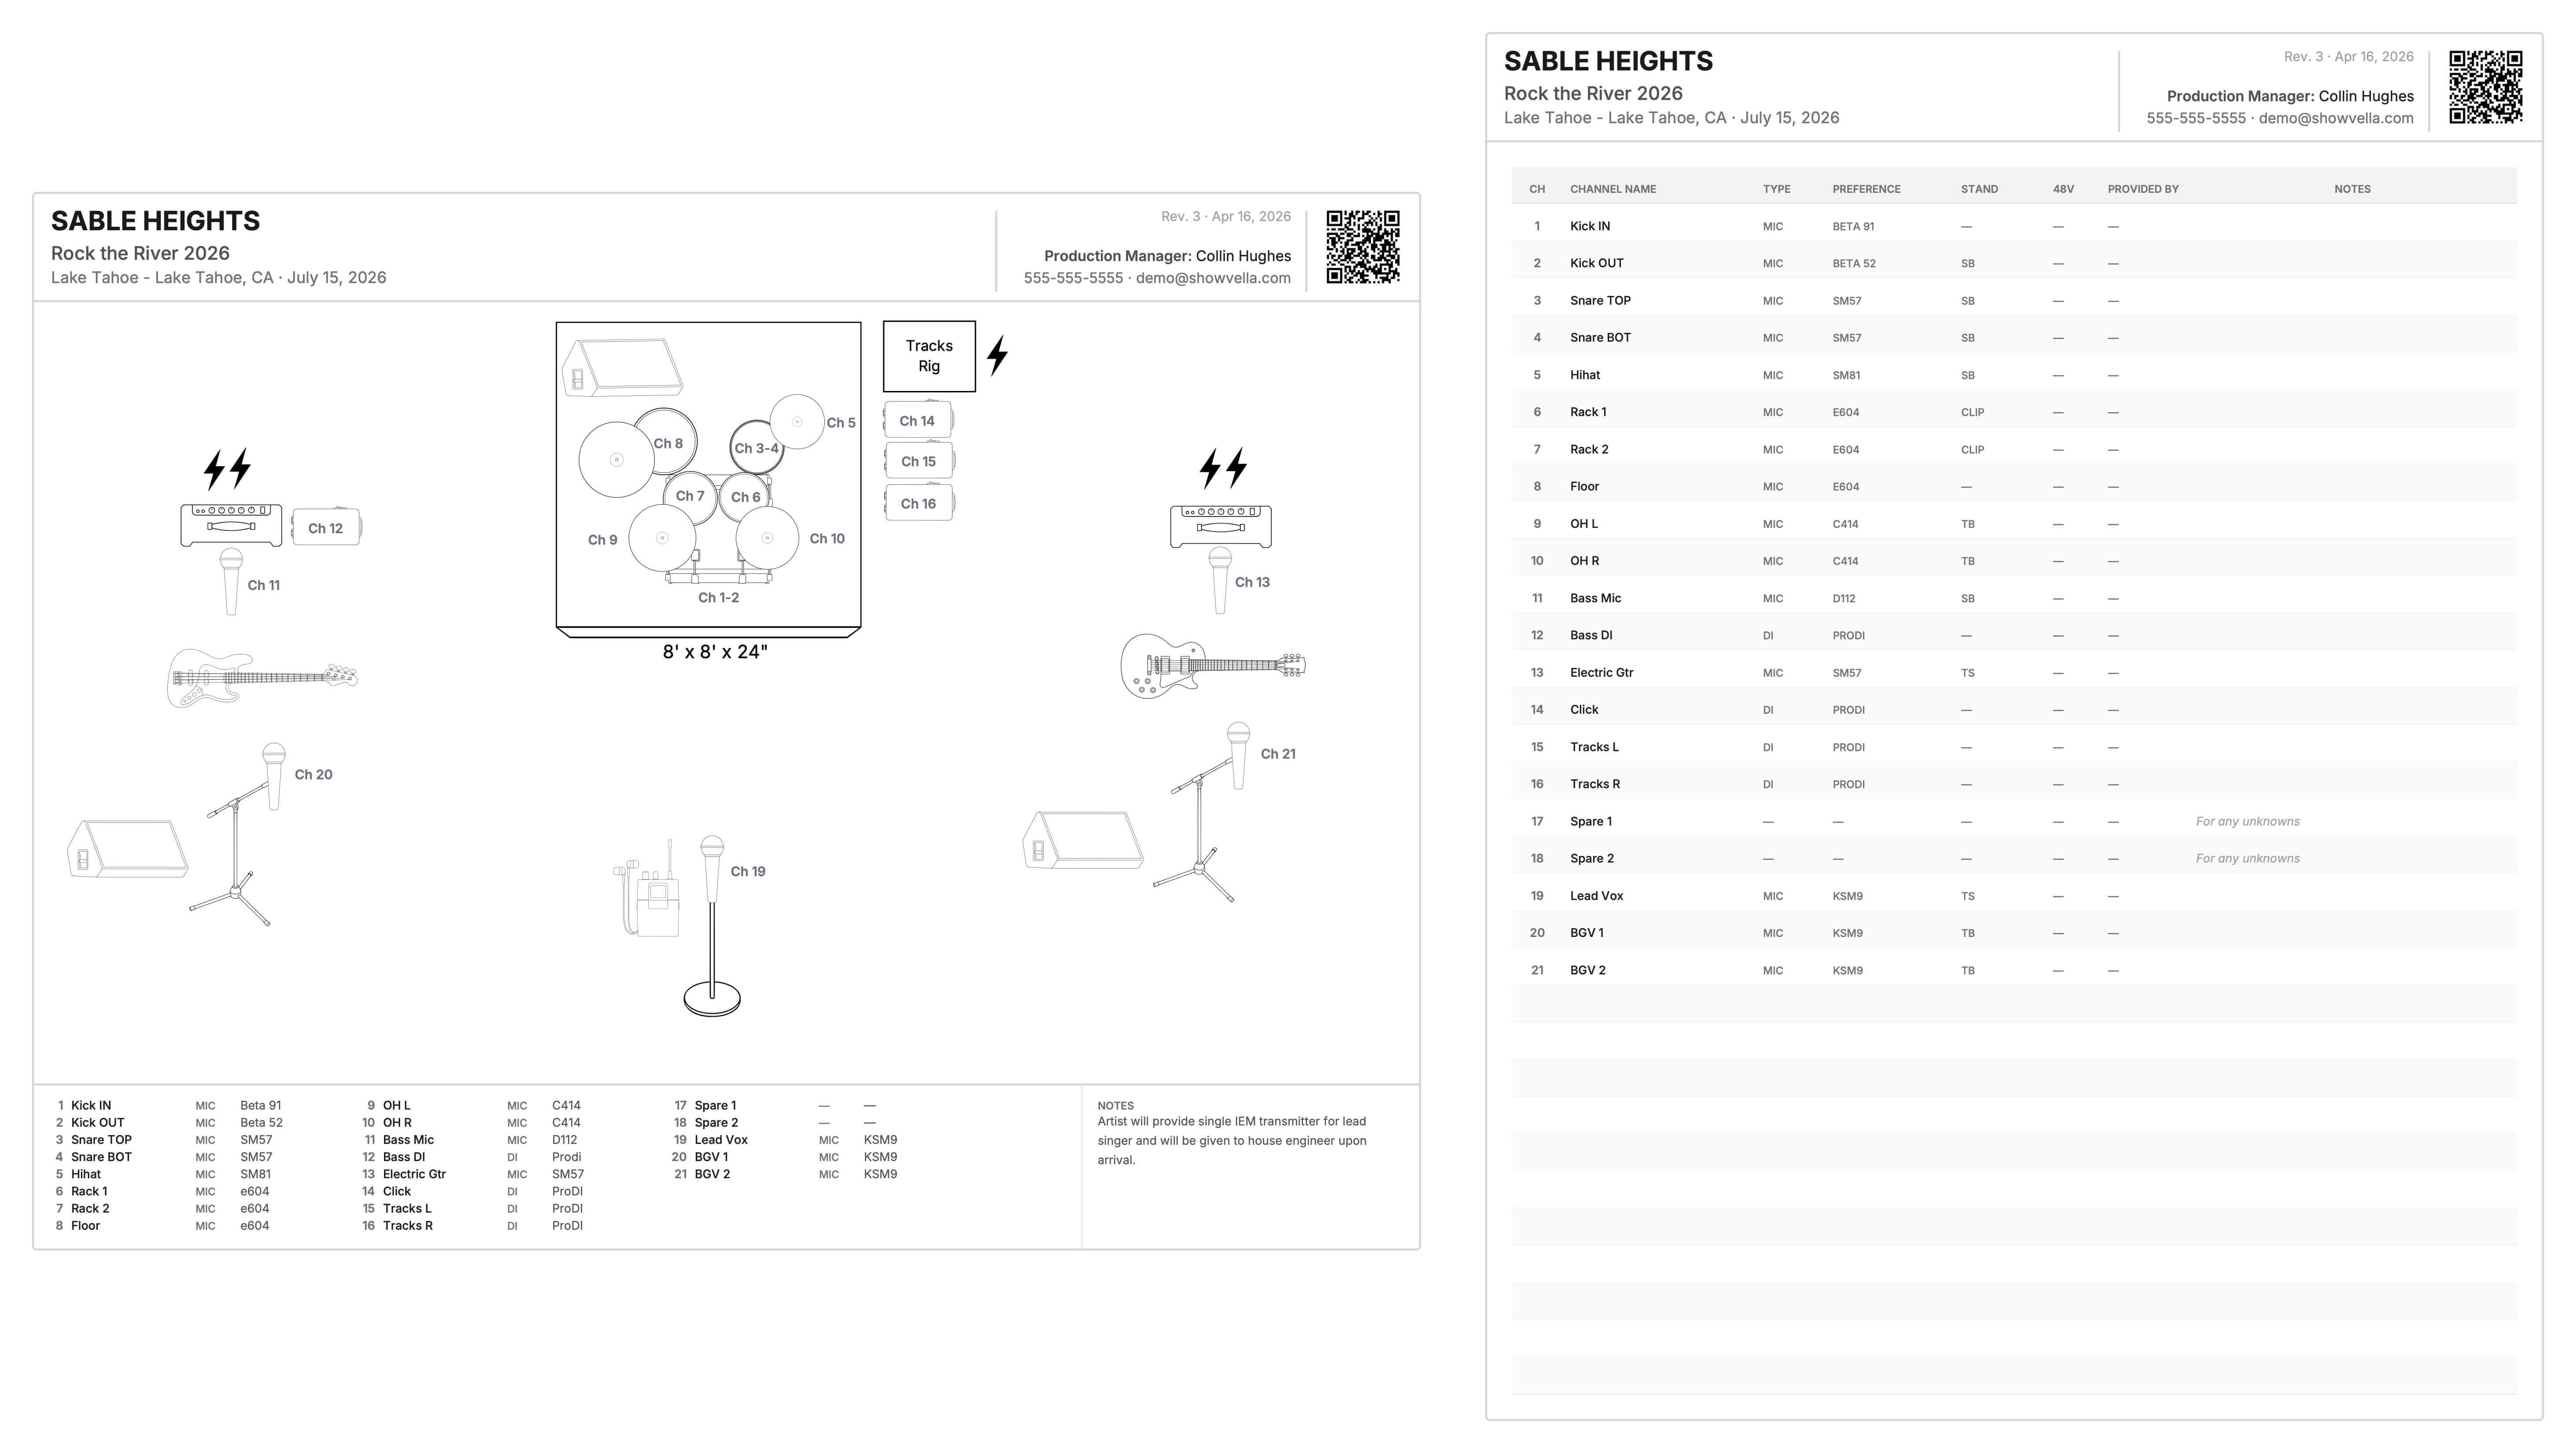
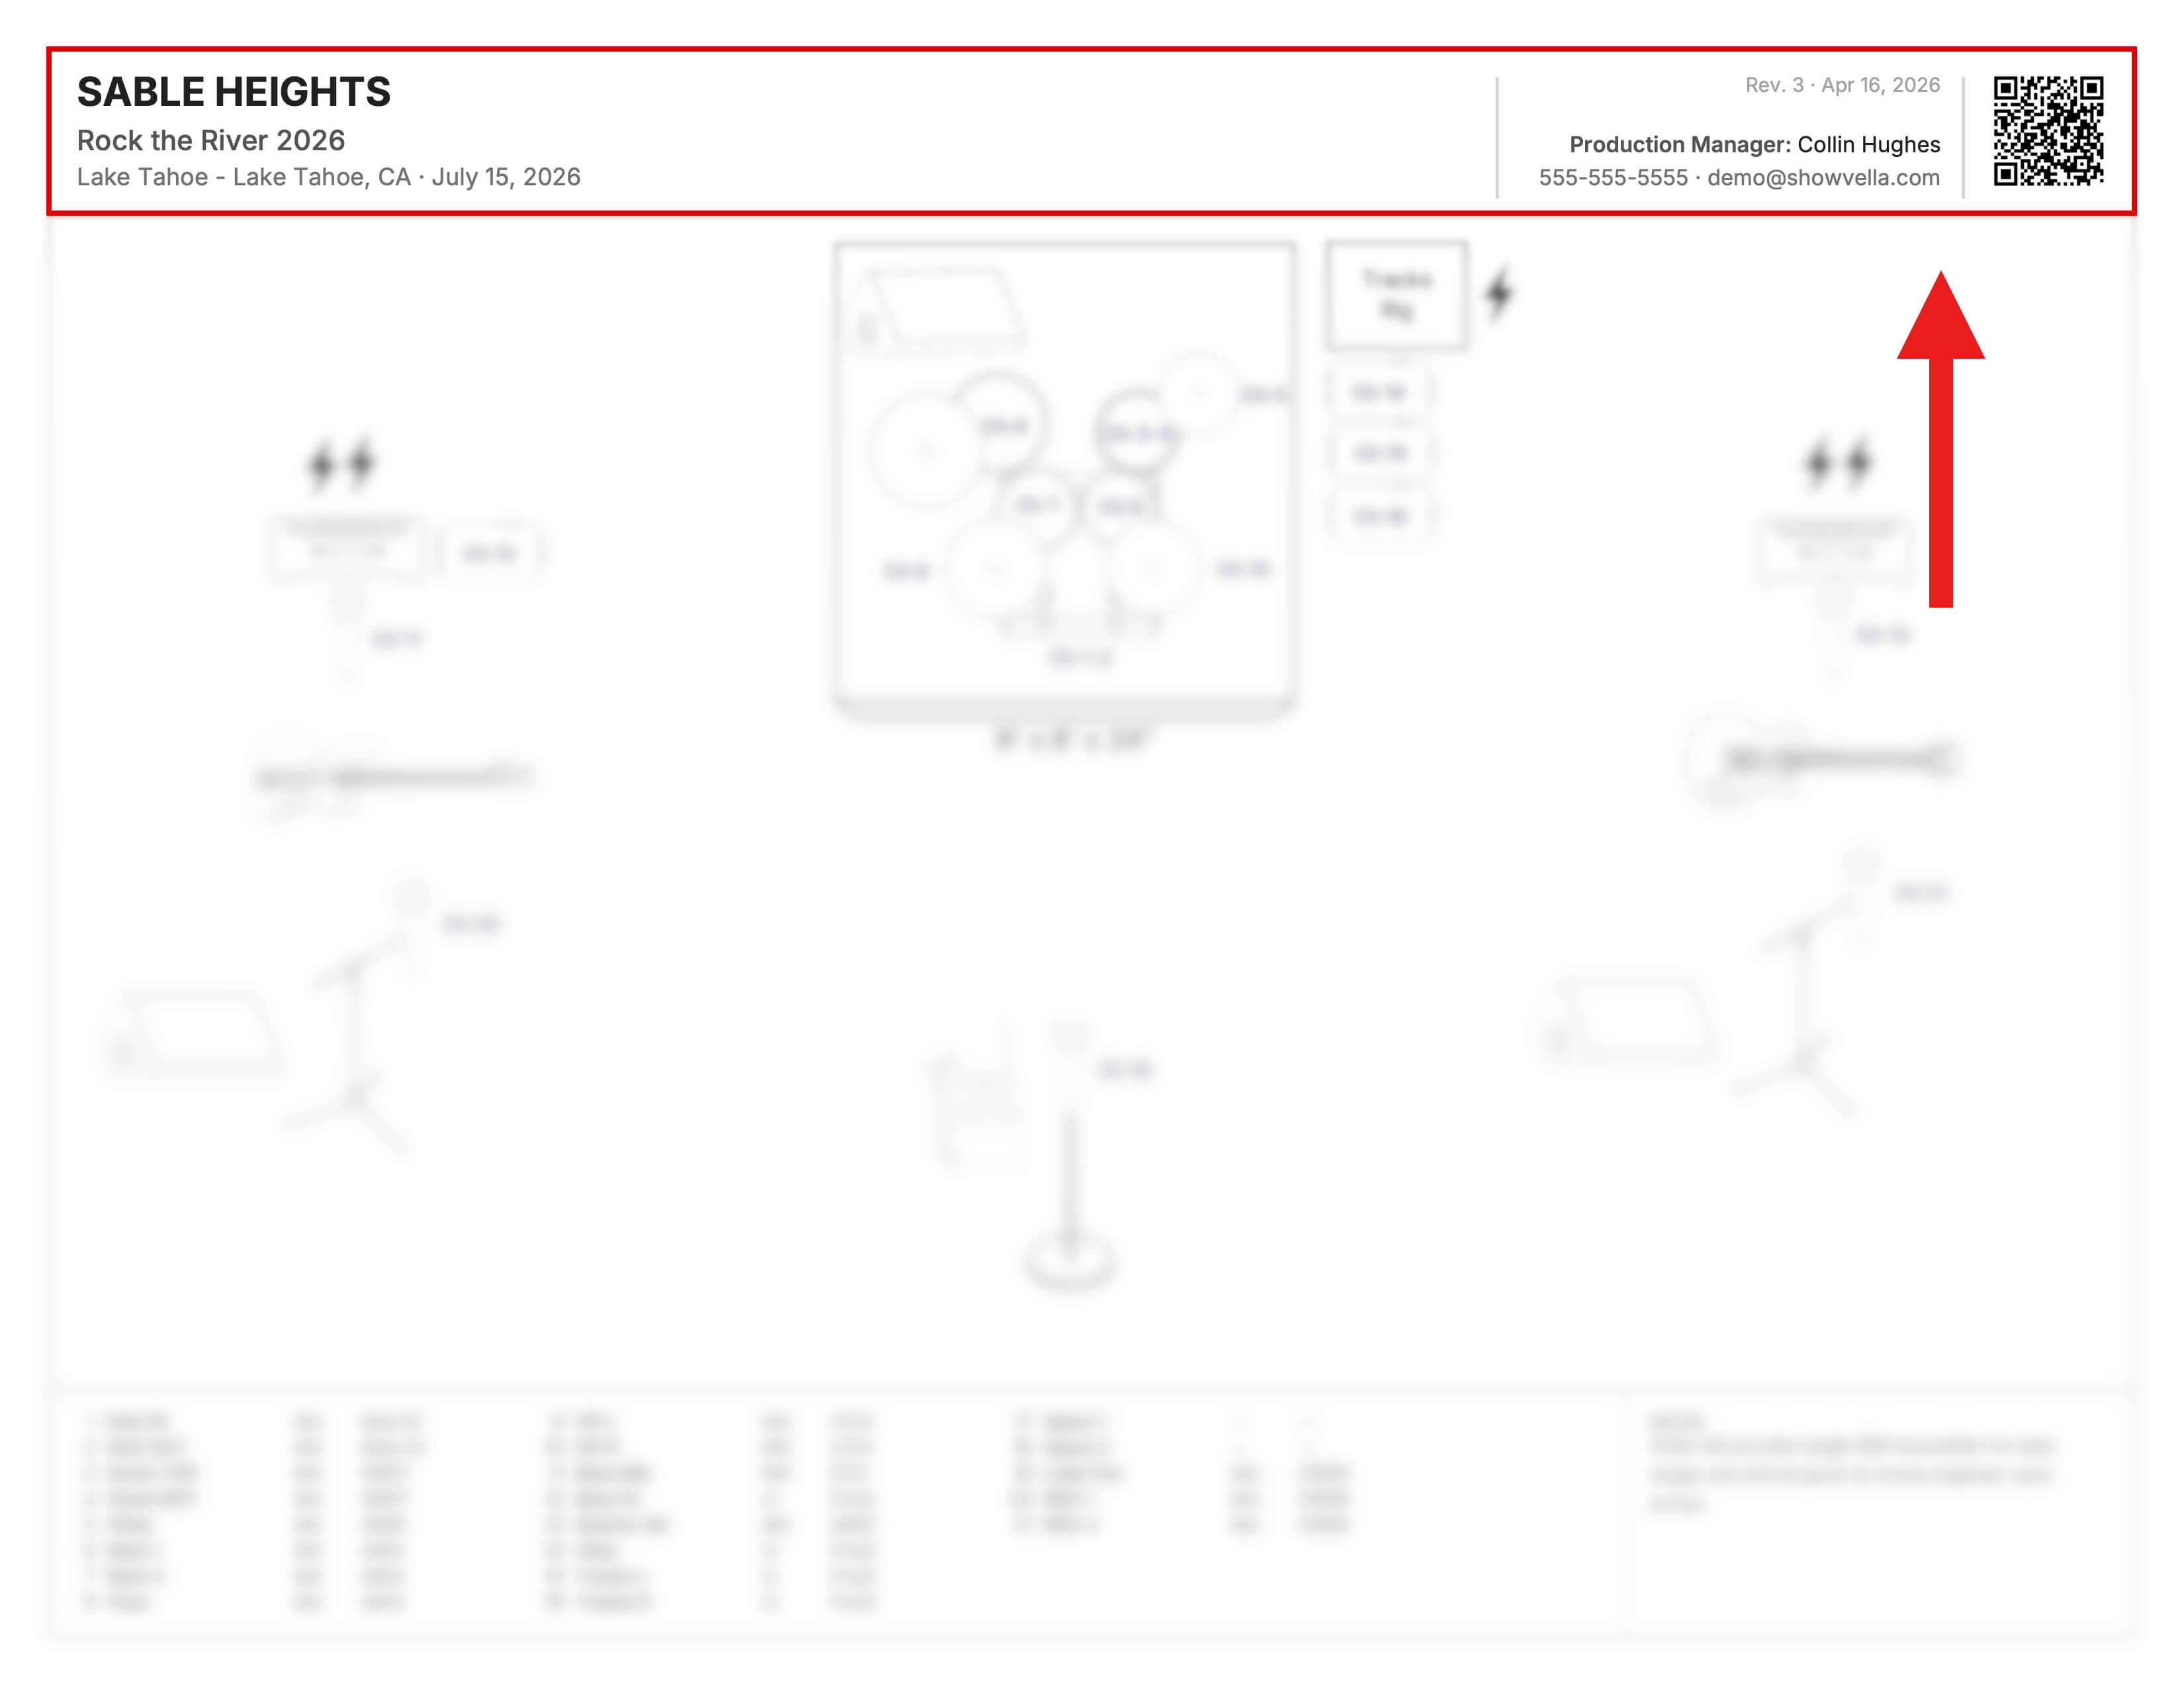
To make a stage plot, you need to create a clean overhead view of your stage that shows every musician's position, all backline gear, input types, monitor placement, power requirements, and any specialty rigs you're bringing. That stage plot must be paired with a detailed input list that assigns a channel number to every single source going through the PA — with mic or DI type specified for each one. Both documents need to include your artist name, venue, event date, revision number, and contact information, and they should always be kept current.
If you want to know how to build all of that correctly, from scratch, keep reading. This guide covers every element of a professional stage plot and input list, in the exact order you should build them.
Before we get into the steps, it helps to have a simple standard in mind. Every great stage plot and input list is built around three C's:
Comprehensive — Your documents must account for everything the crew needs to properly set up your stage. If it belongs on stage, it belongs on the document.
Clear — Every element should be immediately obvious: what it is, where it goes, and what it's for. Nobody should have to guess or make a call to figure out your plot.
Clean — The layout must be organized, easy to read, and professional. A cluttered stage plot creates doubt. A clean one creates confidence.
Keep these three things in mind as you build. They're the filter every decision runs through.
What Is a Stage Plot?
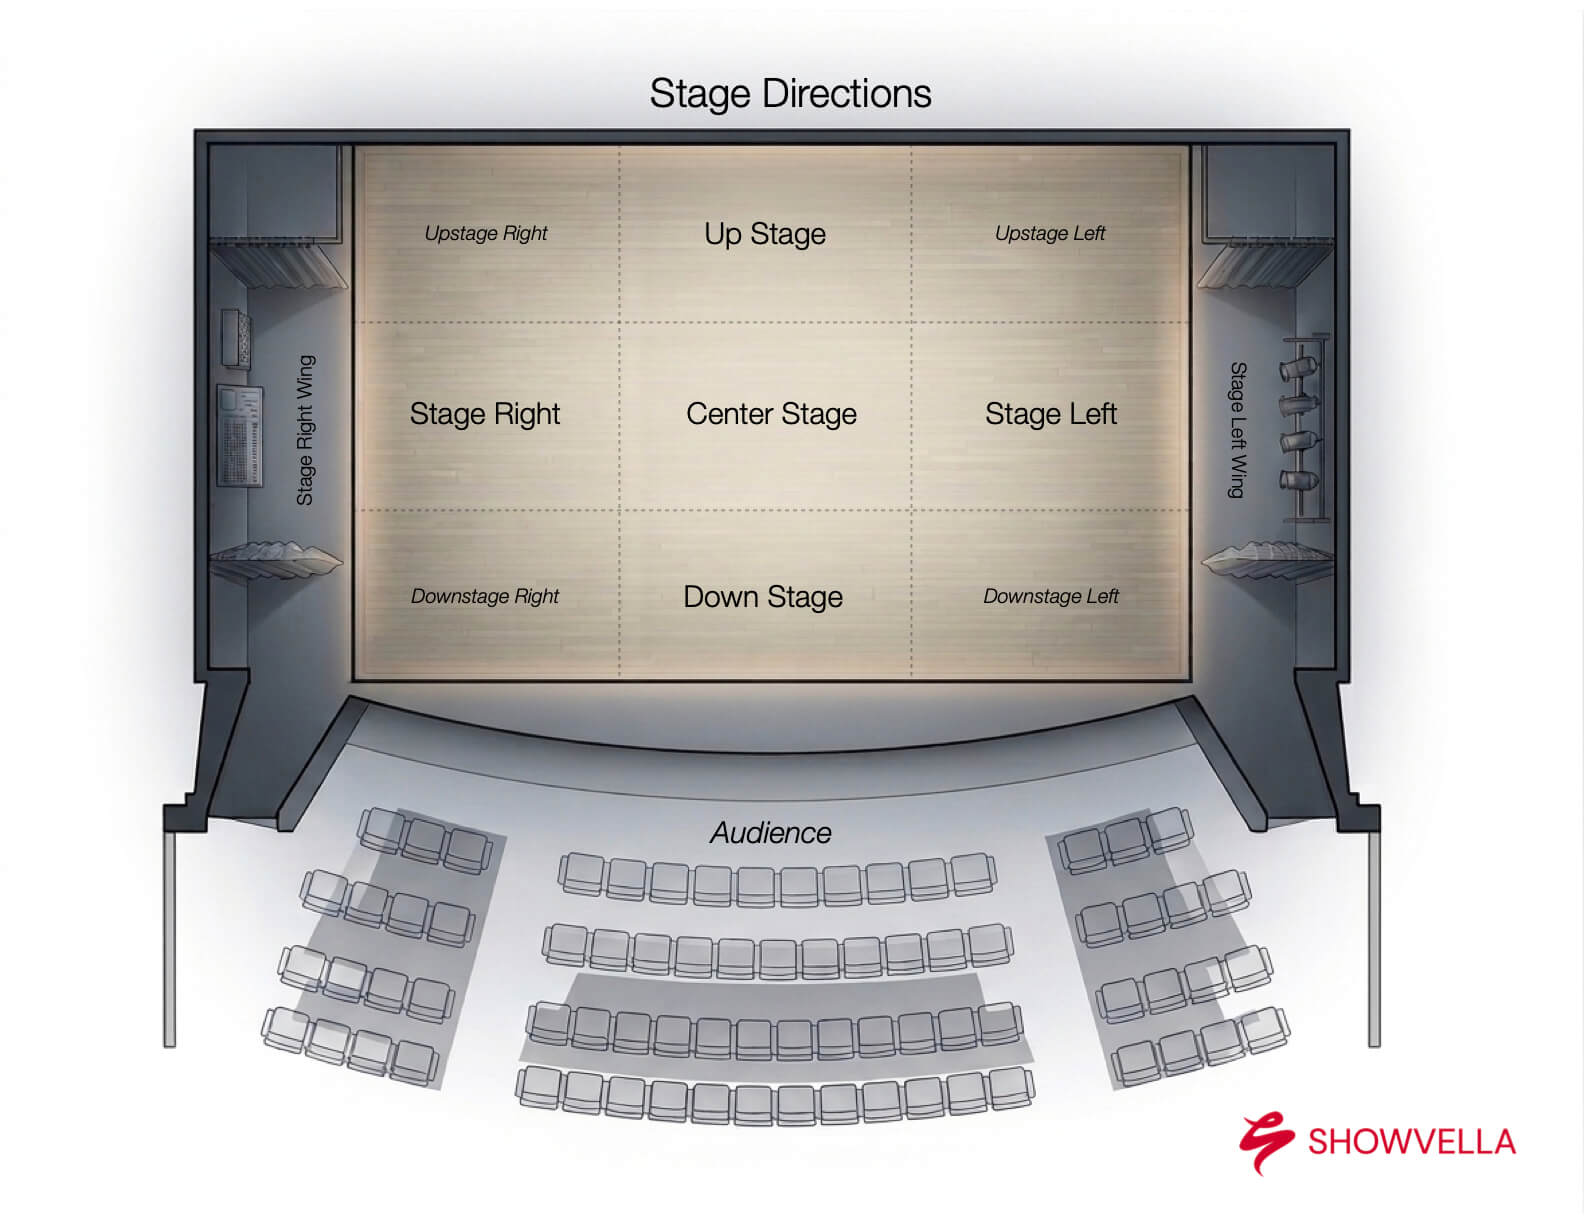
A stage plot is a plan-view — or bird's-eye view — diagram of your performance setup. Think of it as a map of your stage. Downstage, the front of the stage closest to the audience, sits at the bottom of the page. Upstage, the back of the stage, sits at the top. This orientation is universal — any engineer or production manager who picks up your plot will immediately be reading it the same way.
The stage plot tells the venue's crew exactly where everything lives: who stands where, where the amps go, where the monitors need to be, what kind of microphone stands you need, and anything else that affects how the stage gets set up.
One formatting requirement that applies to every stage plot, regardless of what tool you use to build it: stage plots must be black and white and printer-friendly for standard letter printer paper (8.5 x 11). Color adds nothing and creates problems — inconsistent printing, poor readability in low-light backstage environments, and an overall look that feels less professional than a clean, high-contrast black and white layout. Industry standard is black and white because it's readable, reproducible, and professional anywhere it lands.
When your stage plot is ready to send, always export and share it as a PDF. Not a JPG. Not a PNG. Not a screenshot. PDF ensures your formatting stays intact, your fonts render correctly, and the document is printable without any guesswork on the receiving end. Most venues will print your stage plot and pin it up backstage before you arrive. Make it easy for them to do that.
When your stage plot is accurate and professionally presented, your load-in goes faster, your soundcheck is smoother, and the crew walks into your show with confidence rather than questions. That's worth more than most bands realize.
Step 1: Gather Your Show Information First
Before you place a single icon on the page, you need to have the right information locked in at the top of your document. Both your stage plot and your input list should include:
- Artist name
- Event name (festival, show title, etc.)
- Venue name
- Date of the show
- Revision number and date last updated
- Contact information — who should the engineer or venue call if they have questions?
This might seem like housekeeping, but it's actually critical. If you've ever sent a stage plot to a venue, made changes, and then sent a second version — you know how quickly things get confusing. A revision number and updated date make it immediately obvious which version is current. A venue that receives a document with their name and the correct date on it immediately trusts that the information is accurate. That trust is the foundation of a smooth show day.
In Showvella, you fill in your show details once and they auto-populate across both your stage plot and input list simultaneously, so you're never dealing with mismatched documents.
Step 2: Do a Mental Inventory of Everything You Need
Before you start placing things on the page, take five minutes to think through your entire setup. You're essentially making a mental checklist of every single thing that needs to exist on that stage for your show to work. Think through:
- Staging — do you need any risers?
- Backline — drums, guitar amps, bass amps, keyboards, percussion, tracks rig, etc.
- Vocals — how many vocalists, and what stands do they need?
- Monitoring — wedges, in-ear monitors, side fills, etc.
- Power — where do you need outlets on stage, and how many?
- Specialty gear — a computer, DJ turntables, a table, etc.
- Microphones and DI boxes — what's getting mic'd? What's going direct?
You don't need to be writing your input list yet. This step is just about making sure nothing slips through the cracks before you start building.
Step 3: Lay Out Any Staging or Risers
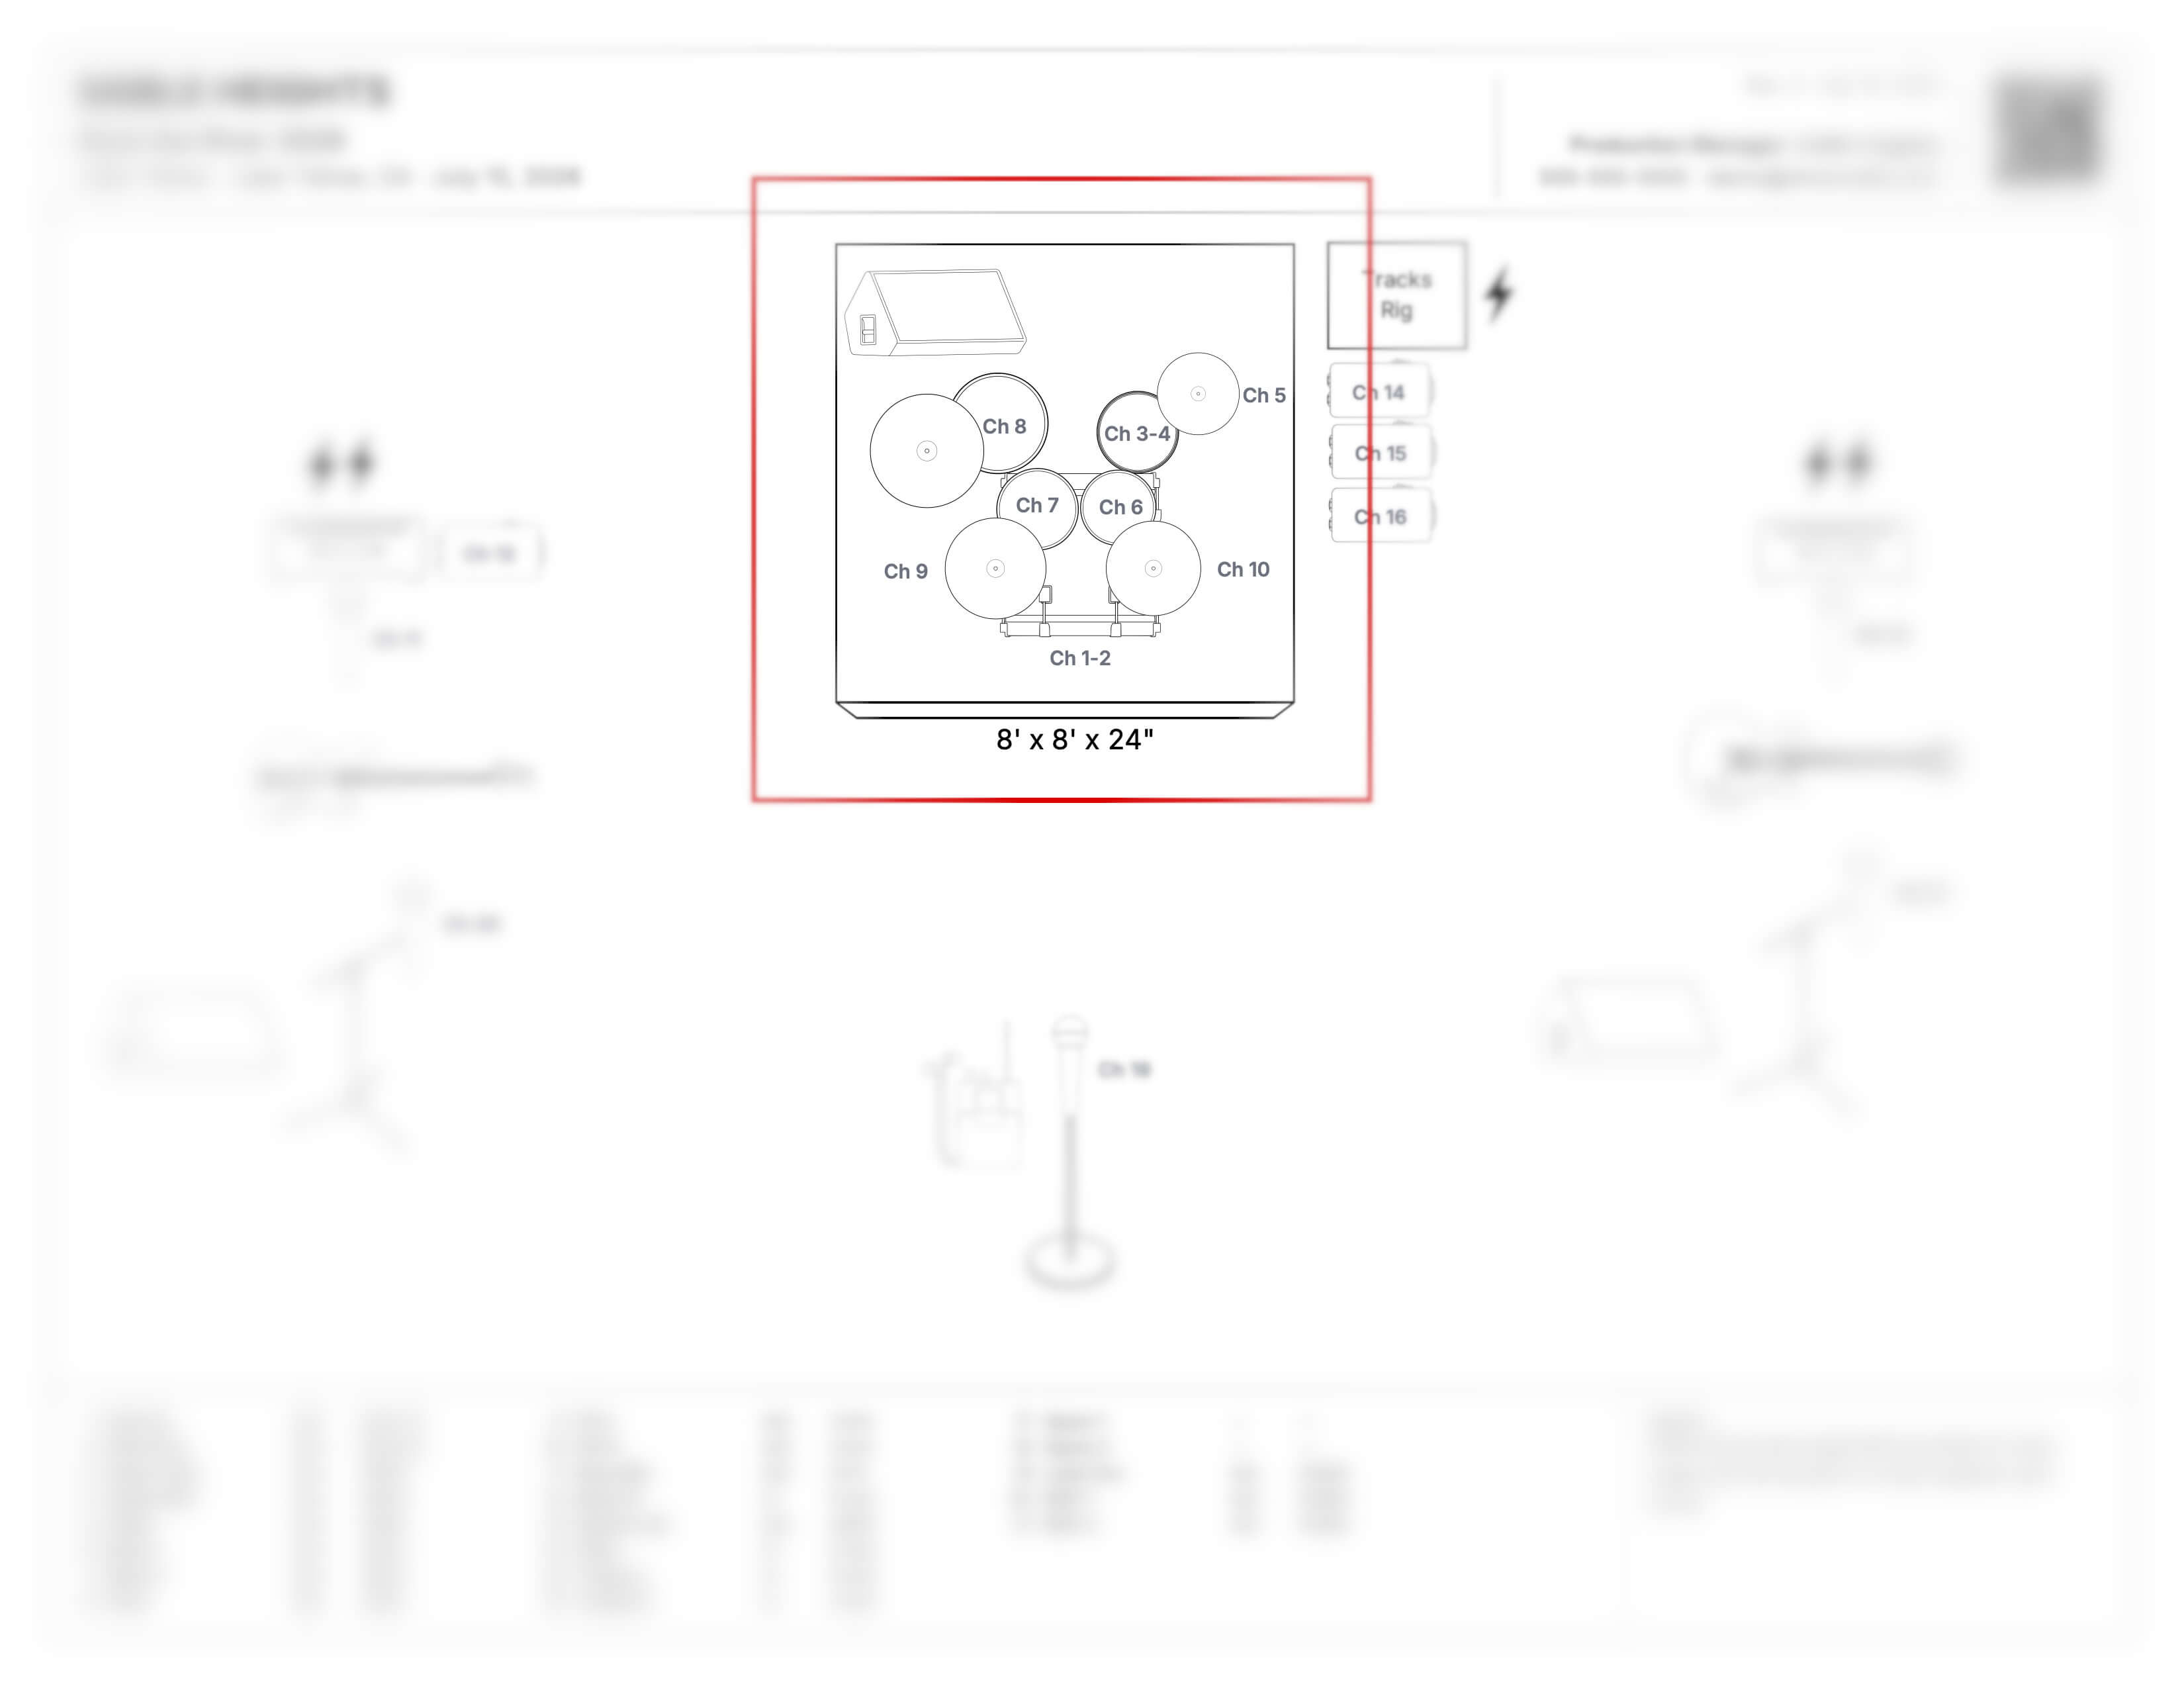
If you have any specific staging needs that sit on top of the main stage — a drum riser, a keyboard riser, a riser for horn players — those go down first. They define the shape of your stage and everything else gets placed around them.
This step gets overlooked more than you'd think. Bands will hand over a stage plot with drums placed perfectly, and the crew shows up to find out the drums are supposed to be elevated two feet on a riser that was never mentioned. If you're bringing it or expecting it, it goes on the plot.
Step 4: Place Your Backline
With your staging sorted, now place your backline — the core gear that makes sound on stage.
Go through each instrument position and get it exactly where you want it. The stage plot doesn't need to specify brand or model. Nobody needs to know you're running a Mesa/Boogie Dual Rectifier into a 4x12 cab. The plot just needs to show that you have a guitar amp, and where it lives. The icon represents the type of gear; not the specifics of it.
Typical backline elements to place:
- Drum kit (with or without a riser)
- Guitar amp(s)
- Bass amp
- Keyboard rig
- Percussion setup
- Tracks or click rig — if it lives on stage, place it. If there's no dedicated icon in your tool, a labeled rectangle is perfectly professional. Write "Tracks Rig" and put it where it will live.
Place everything where you actually intend to perform, not just where it looks clean on paper. The plot should reflect reality — because the crew is going to set the stage based on what they see on that page.
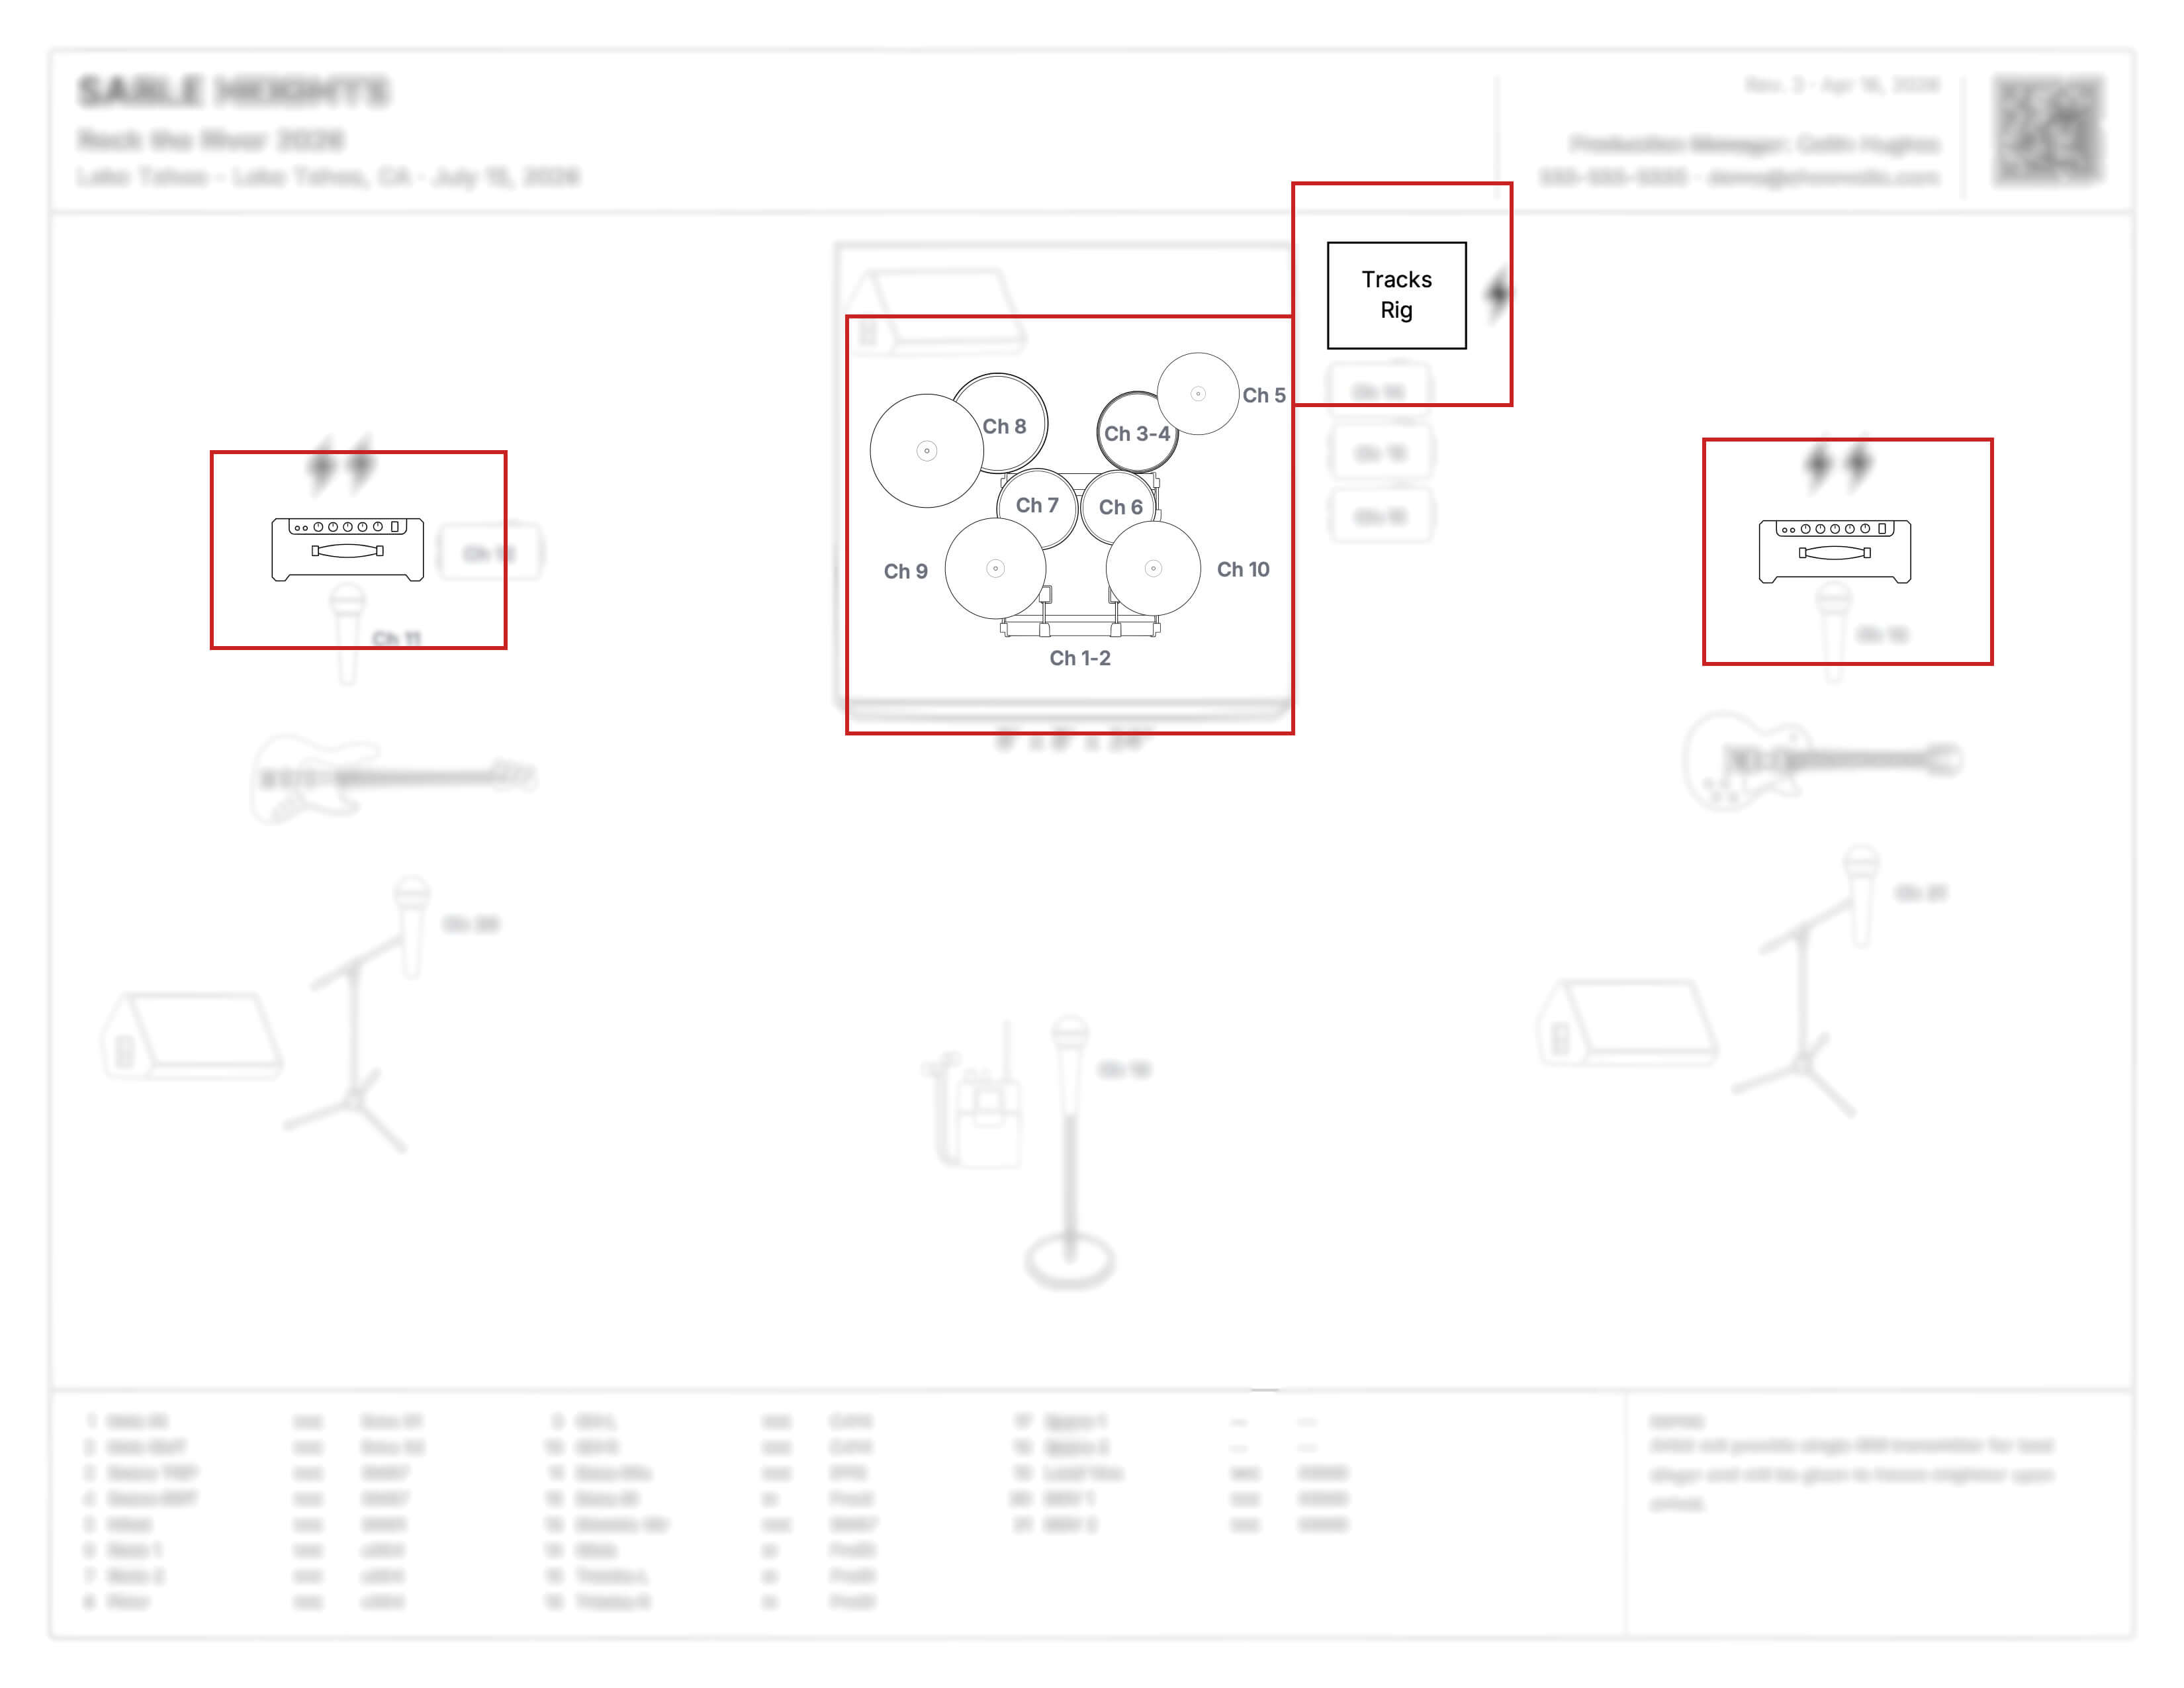
Step 5: Indicate Mics, Stands, and DI Boxes
Once your backline is placed, you need to communicate how each element on stage is being captured — whether that's through a microphone, a DI box, or both. This is one of the areas where stage plots vary the most, so it helps to understand the general conventions before you start placing icons.
When working with an icon-based stage plot — which is the standard for professional, printer-friendly documents — here's how different instruments are typically handled:
Drums get no mic or stand indication on the plot. It's universally assumed that a drum kit will be mic'd, and cluttering the visual with mic icons on every drum would make the plot harder to read, not easier. The engineer knows. Your input list covers all the channel specifics.
Vocals are the one place where both a mic icon and a stand icon are shown on the plot. The stand is a physical setup requirement — the crew needs to know what type to place at that position before you arrive. The most common vocal stand types are:
- Tall boom — the standard for most vocalists
- Tall straight — no boom arm, clean look
- Short boom or short straight — for lower-height performers
- None — for handheld mics or wireless belt packs
Everything else — guitar amps, bass, keyboards, acoustic instruments, a tracks rig — gets a mic icon, a DI icon, or both, based on how the signal is actually being captured. Showvella's recommendation is to always show the mic or DI indication, and leave the specific stand choice to the input list. That keeps the plot clean while still giving the engineer everything they need to prepare.
It's worth noting this isn't always perfectly consistent across the industry — different bands and engineers have their own conventions. The important thing is that your plot is readable and your input list fills in any gaps. When in doubt, show more rather than less, and let the input list clarify the details.
One more thing that needs to be visually clear: if an instrument requires multiple inputs, the plot should show that. A guitarist running two mics on his amp should have two mic icons on that amp, not one. A keyboard player running stereo should show two DI boxes, or a single DI labeled with both channel numbers to indicate a stereo pair. If someone picks up your stage plot and counts the icons, that count should match the input list exactly. This is where the two documents are most tightly connected.
In Showvella, the stage plot and input list are automatically linked and kept in sync. As you assign inputs to elements on the plot, the input list builds itself. If you add a second mic to a guitar amp or a second DI to a keyboard rig, that change is immediately reflected on the input list — and vice versa. You never have to manually update both documents or worry about them getting out of step with each other.
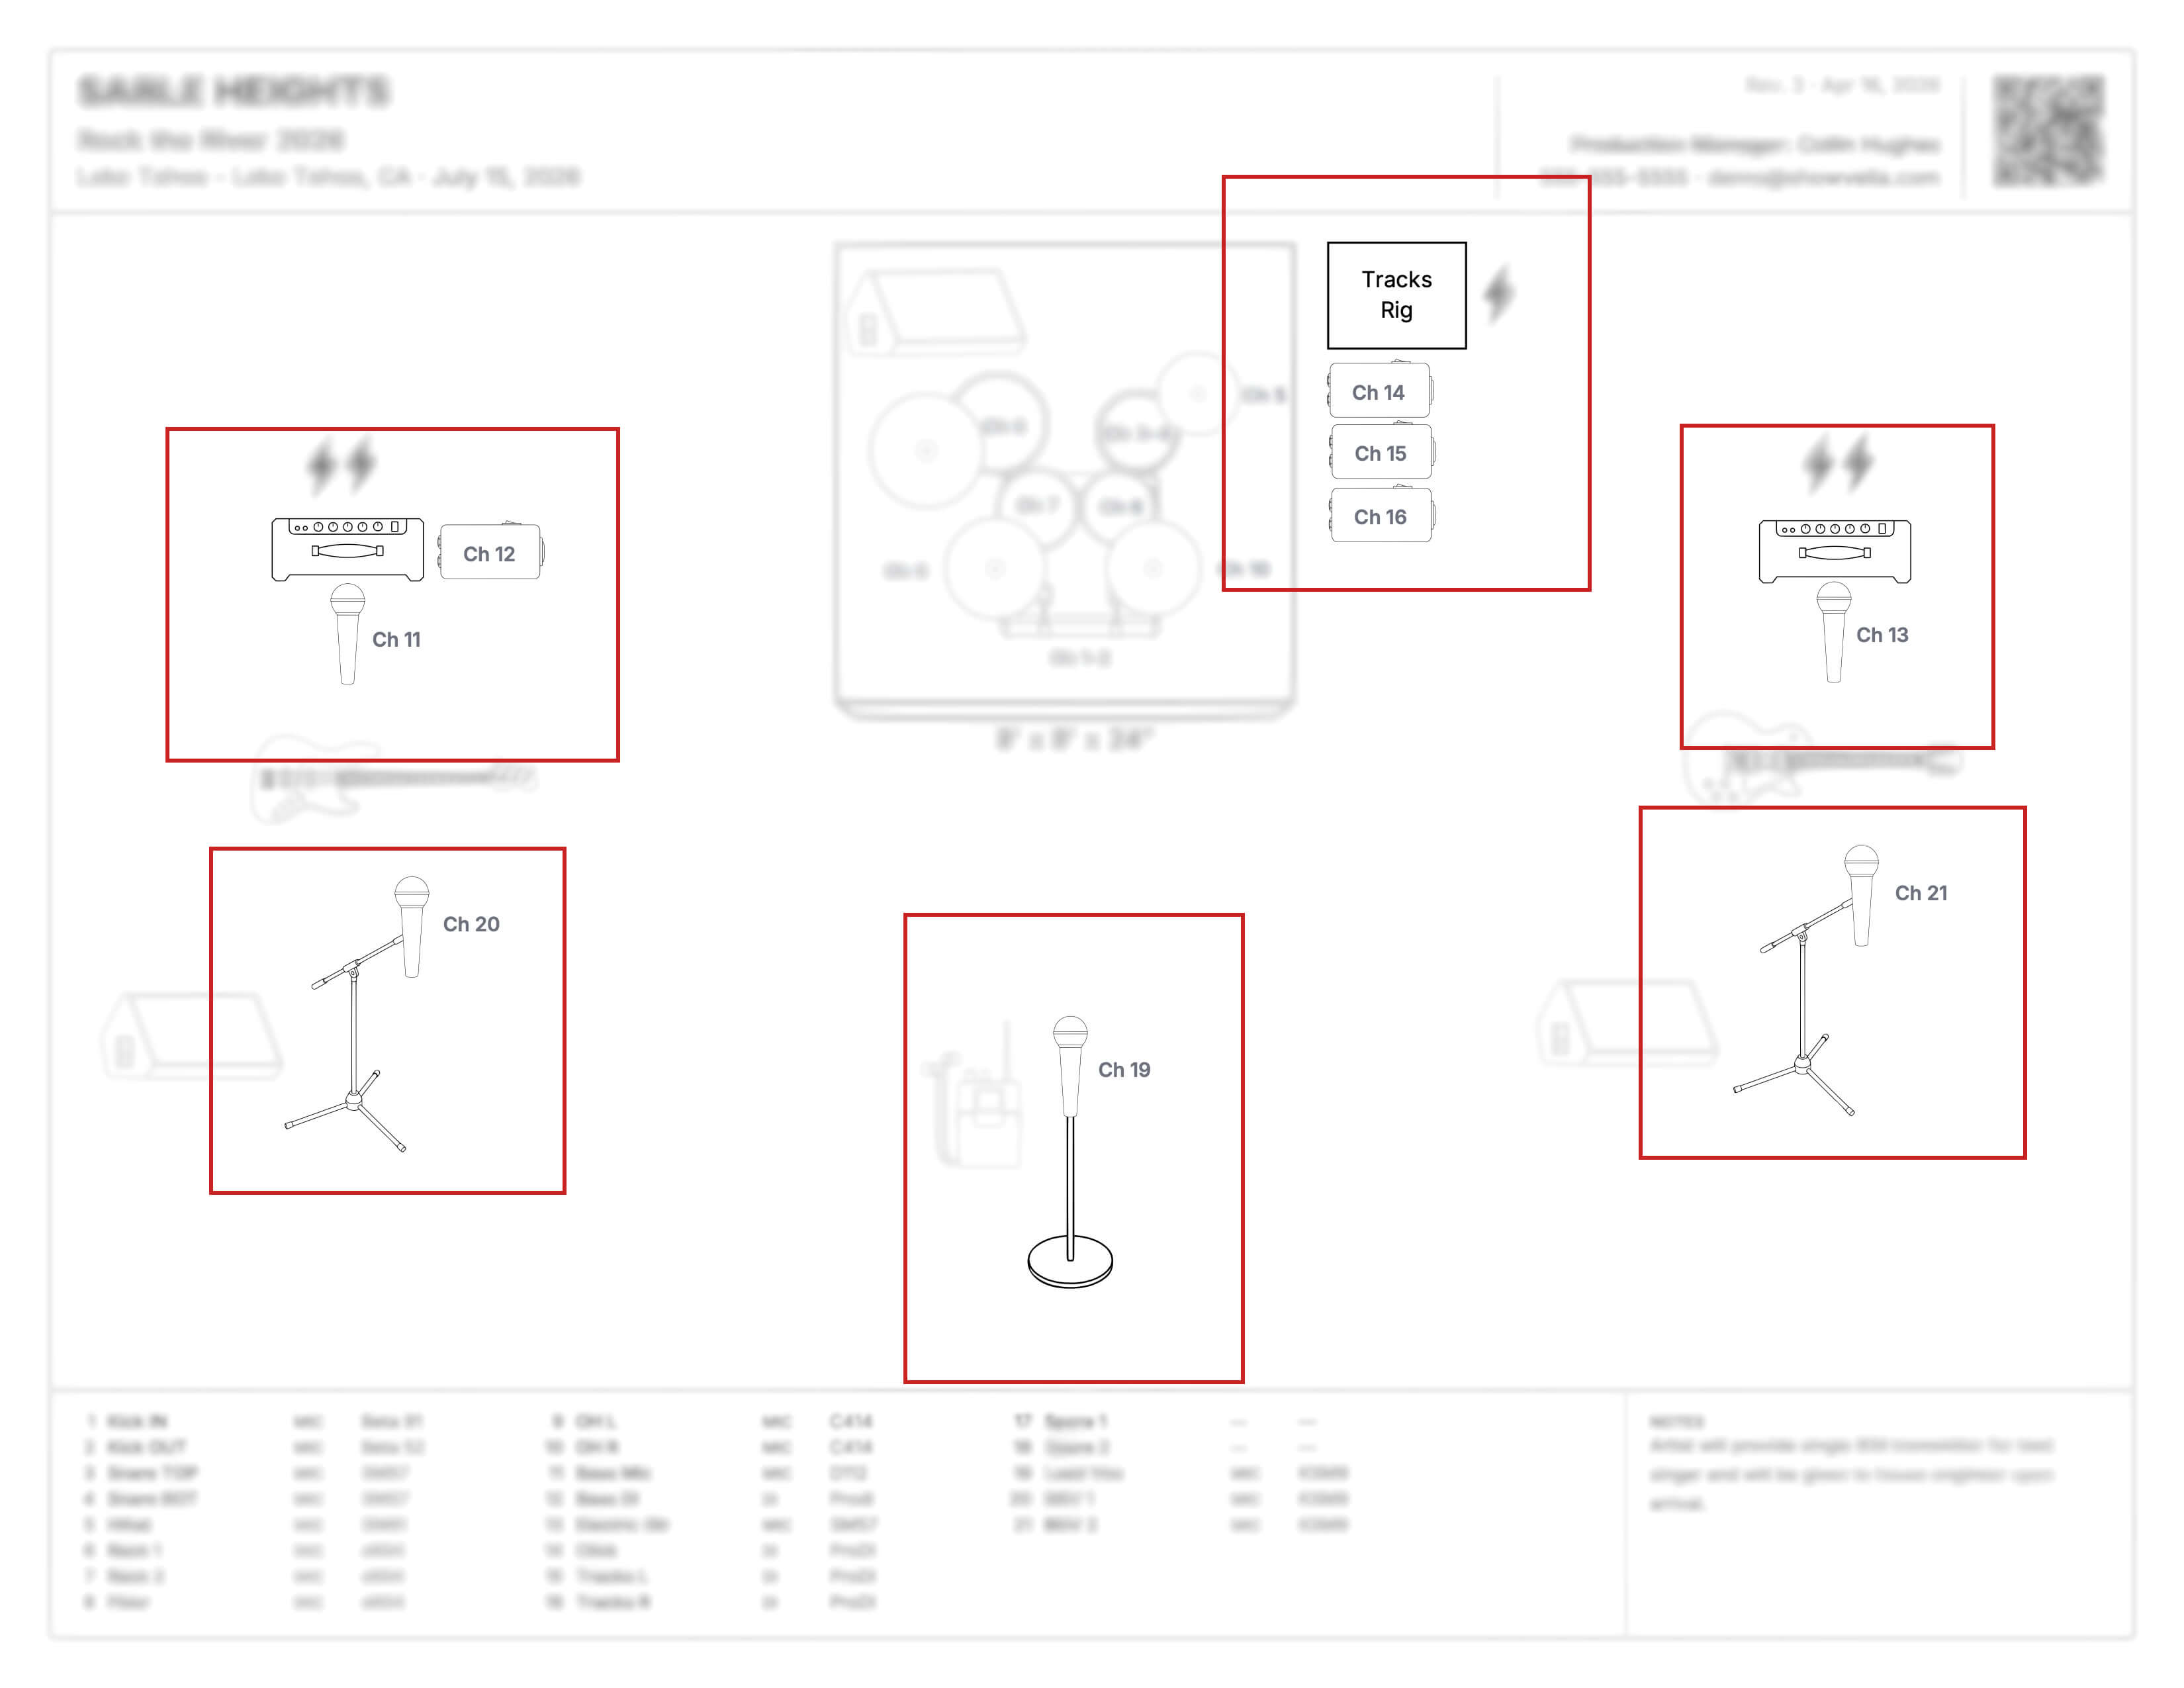
Step 6: Place Your Monitors
Monitoring is one of the most overlooked elements of a stage plot, and one of the things engineers most need to know in advance.
For every person on stage, think about what they need to hear and where their monitor should live. A drummer might need a wedge pointing at them from the side of the riser. A lead vocalist might want two wedges spread across downstage center. A guitarist who can hear off their amp might not need a monitor at all — and that's worth noting too.
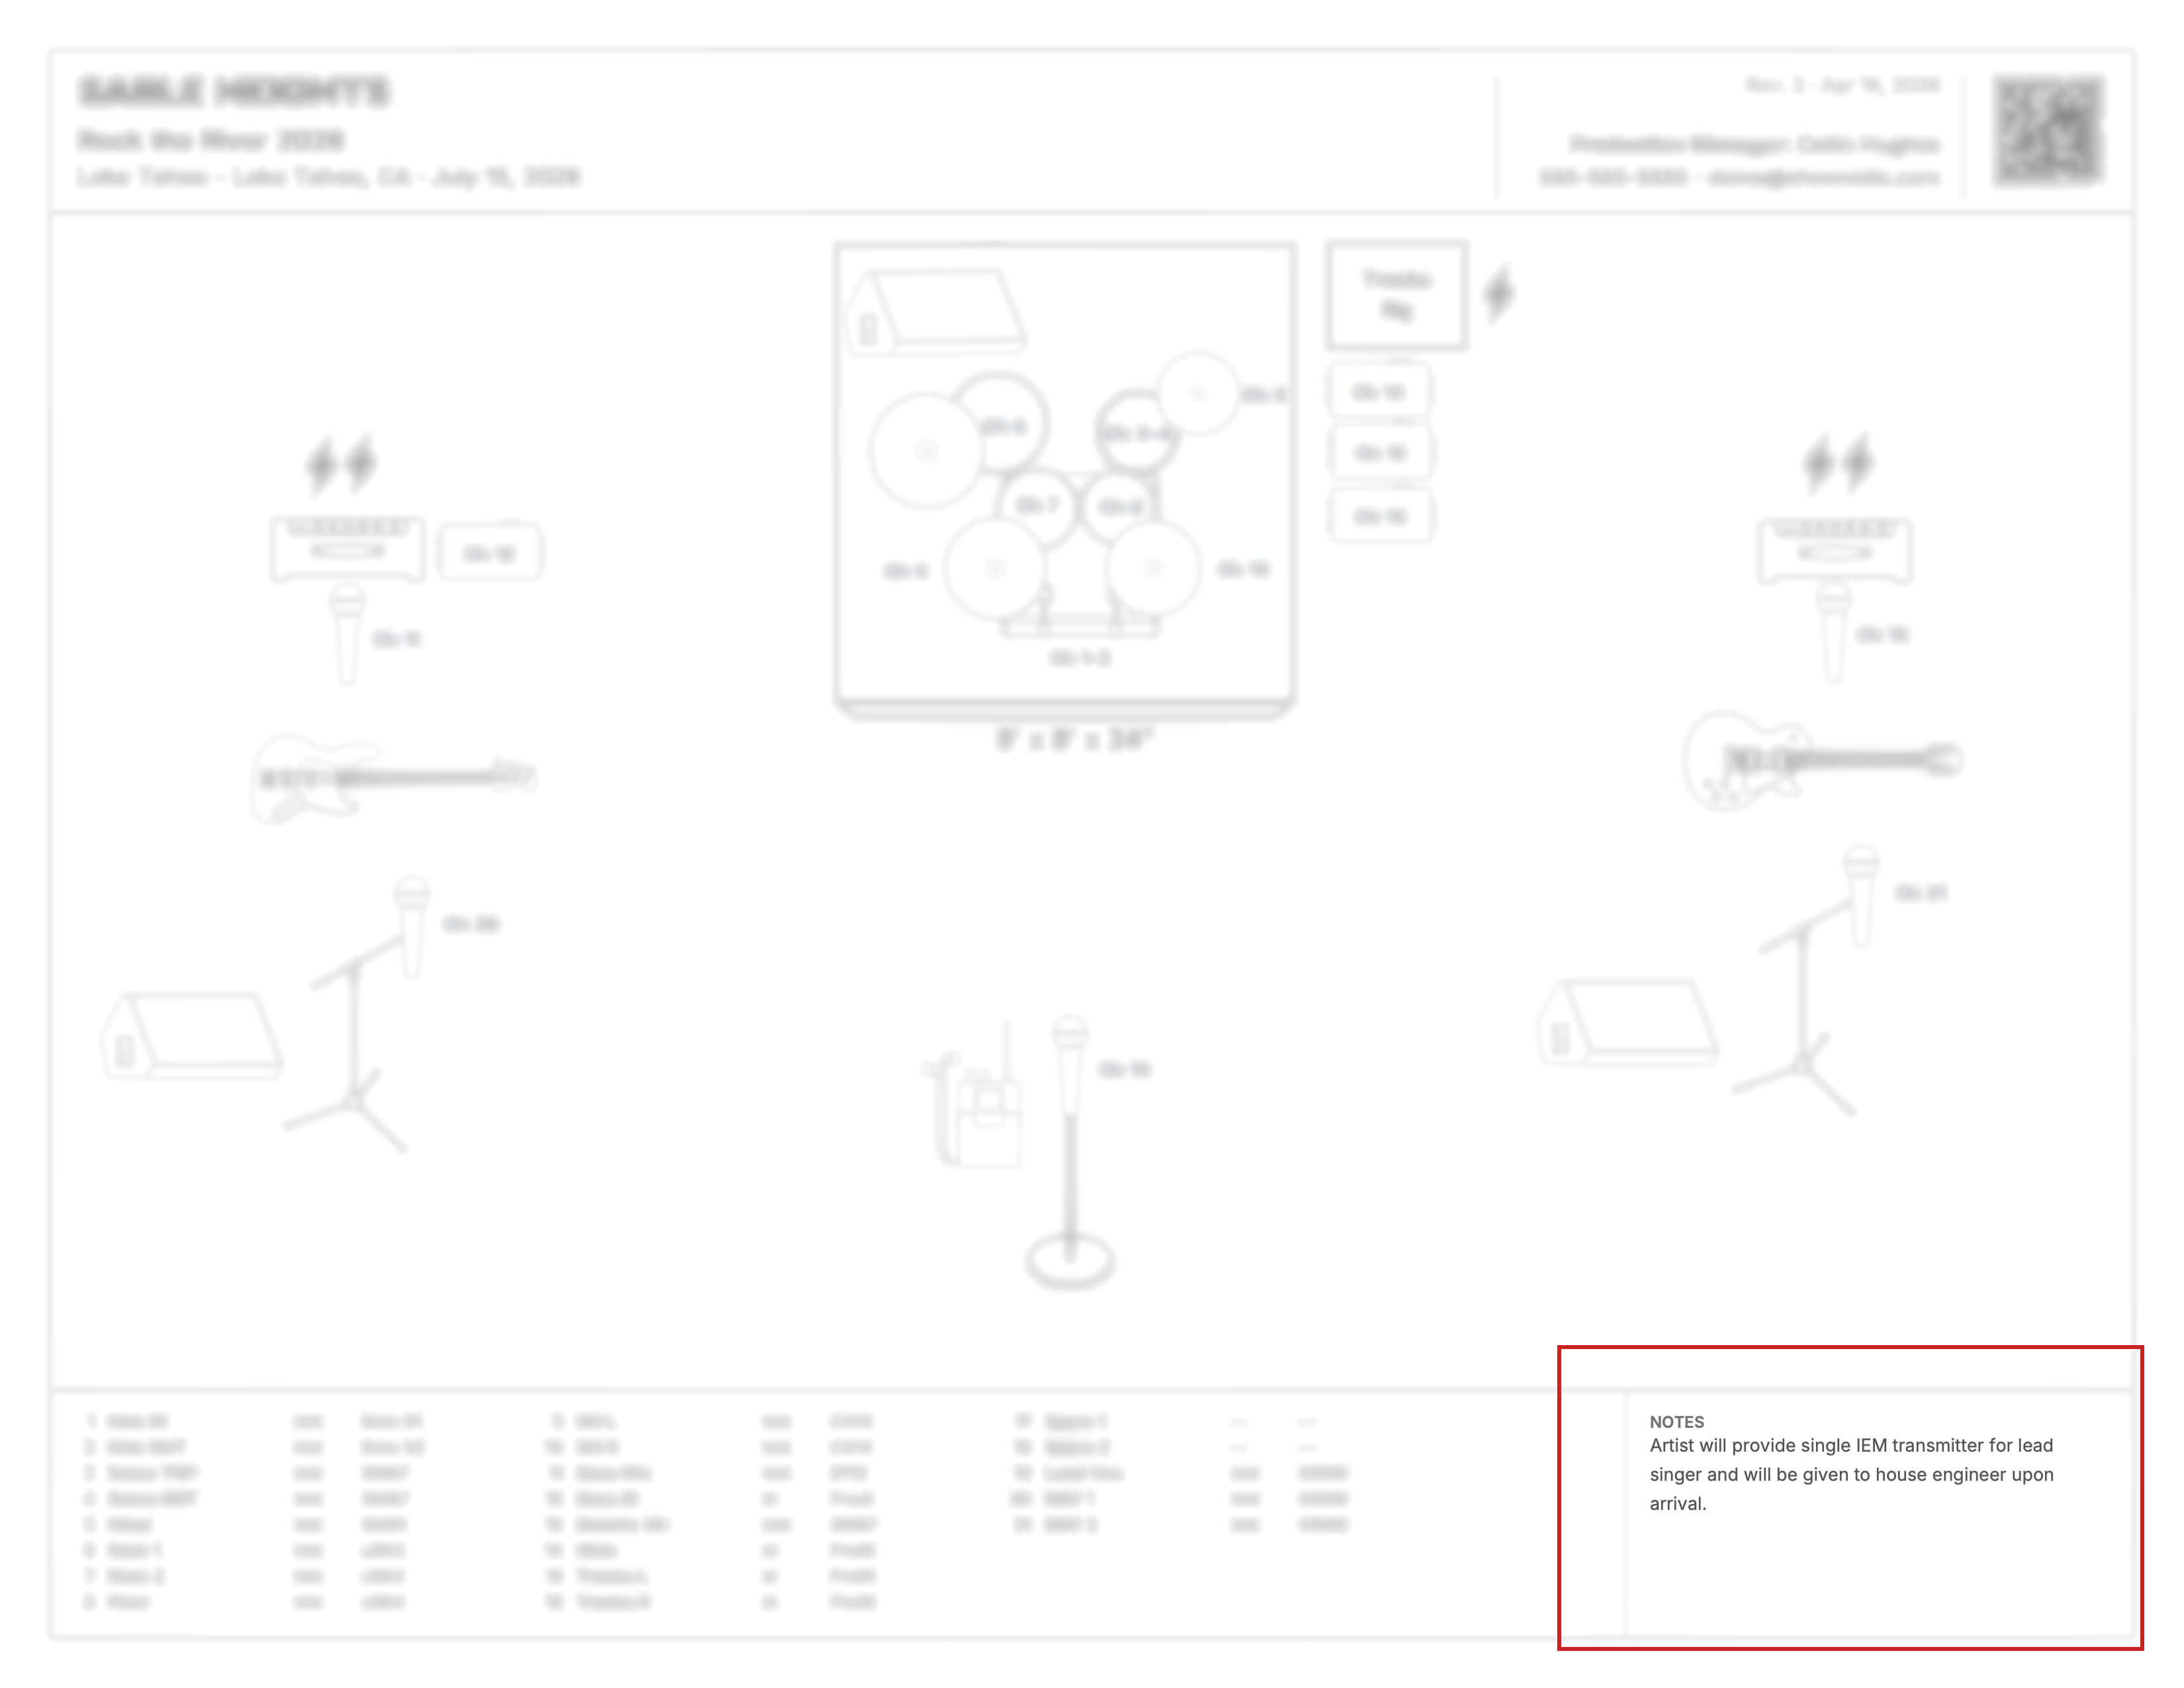
If your band uses in-ear monitors (IEMs), that needs to be clearly documented. If your IEM rig lives on stage — a transmitter rack, for example — indicate on the plot where it goes. If it lives off-stage, note it in your notes section with a single clear line: "Band is bringing their own IEM system with split snake and 50-foot tails."
The notes section on a stage plot should always be short. A few specific, well-worded lines. If you're writing paragraphs, it usually means the plot itself isn't communicating clearly enough. Move information into the visual layout wherever possible, and save the notes section for things that genuinely can't be shown visually.
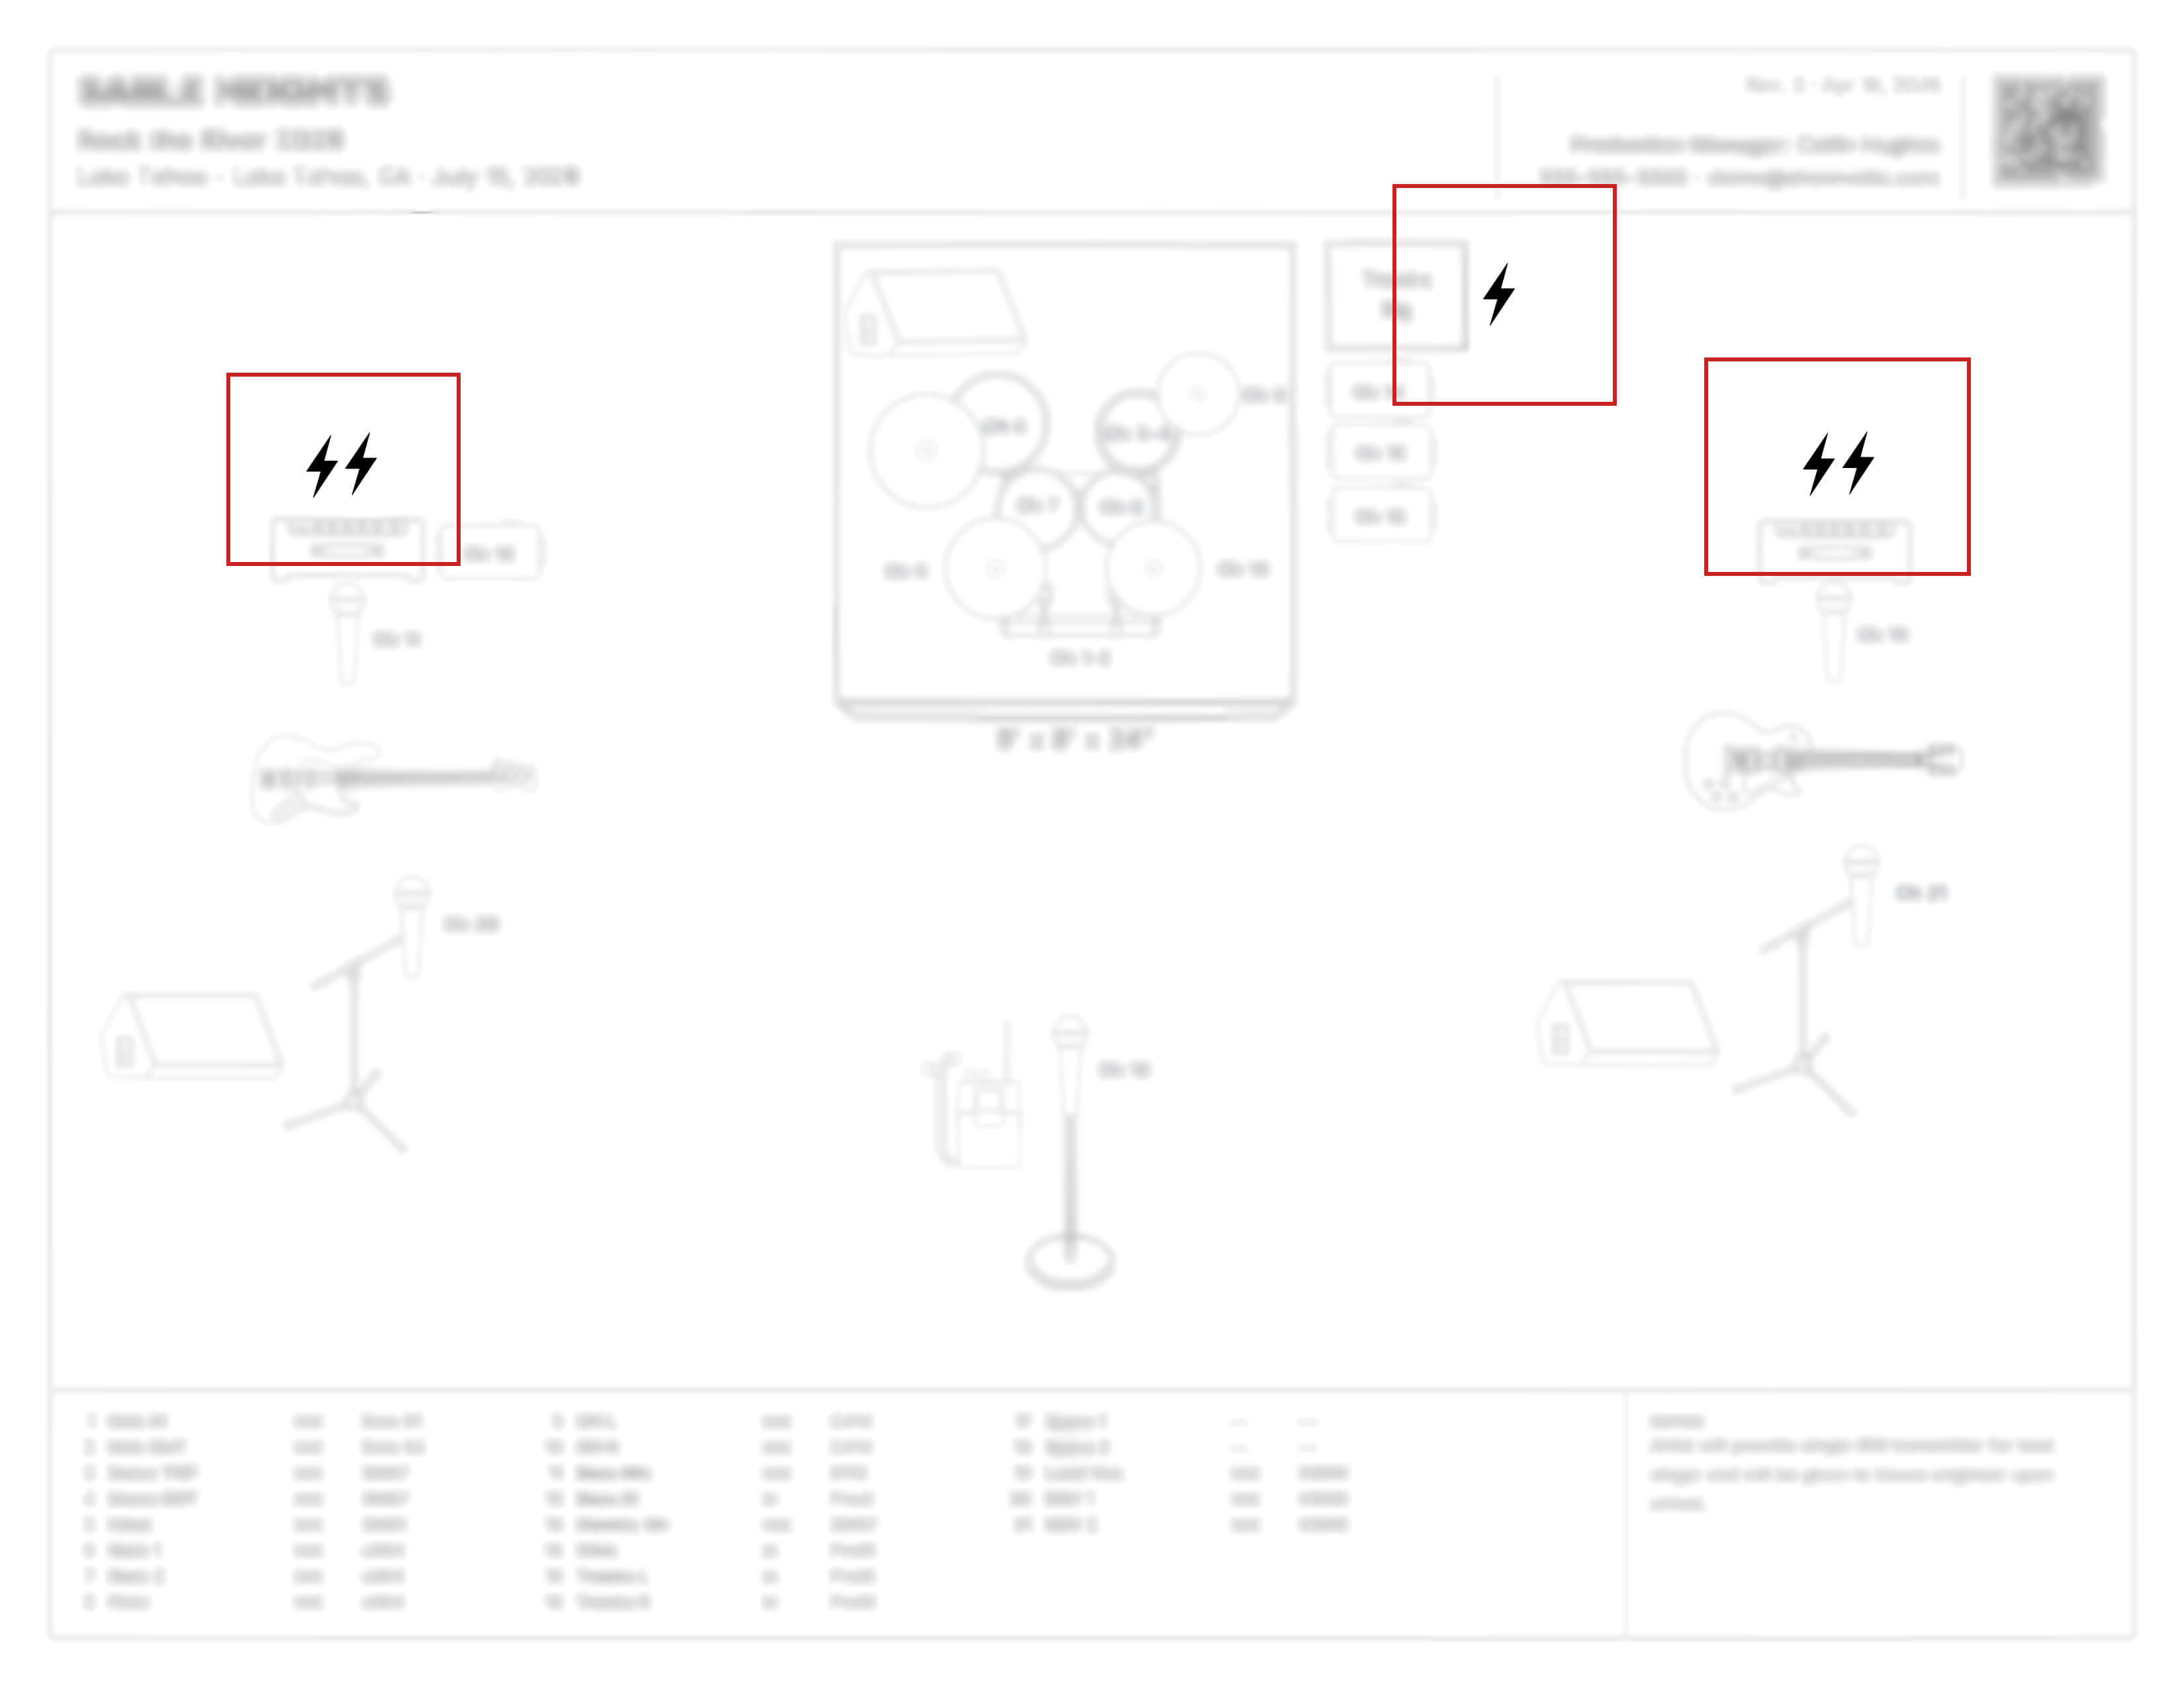
Step 7: Document Your Power Requirements
Power is practical, unglamorous, and one of the most frequently overlooked elements on a stage plot. Leaving it off creates real problems on load-in day when crew members are running power drops on the fly.
Think through each position on stage: Does the keyboard player need two outlets for their rig? Does the guitarist have a pedalboard that requires a power outlet? Every piece of gear that needs power should be accounted for — where on stage, and how many outlets. If you have specific requirements — a dedicated circuit for sensitive electronics, for example — put that in the notes section.
Venues that receive a stage plot with power requirements clearly marked can prepare accordingly. Venues that don't are figuring it out while you're standing on stage waiting. Get it on the plot.
Step 8: Add Any Remaining Gear
Go back through your mental inventory from Step 2 and make sure everything that belongs on stage is visually represented. This includes:
- Chairs — if anyone needs to sit, indicate it.
- Tables — for a laptop, a controller, or anything that needs a surface.
- Anything else physical that a crew member would need to set up or account for.
If it's going to be on that stage, it belongs on that plot.
Pro Tip: Don't Forget the Notes Section
Every stage plot has a small notes section — a text area on the document for anything that needs to be communicated but can't be shown visually. Now that your stage is fully laid out, take a pass through everything and ask: is there anything here that a crew member might misunderstand or need more context on?
Good candidates for the notes section include things like: whether the band is bringing their own IEM system, a specific power requirement that isn't obvious from the plot, or a brief heads-up about a piece of unusual gear. One or two lines per item, written clearly and directly.
What doesn't belong in the notes section is anything that can and should be shown visually on the plot. If your notes are running longer than three or four lines, that's usually a sign that the plot itself isn't communicating clearly enough — and the fix is to improve the visual, not add more text.
A good notes section is short, specific, and only exists to cover the gaps. If your stage plot is comprehensive, clear, and clean, your notes should be minimal.
Step 9: Build Your Input List
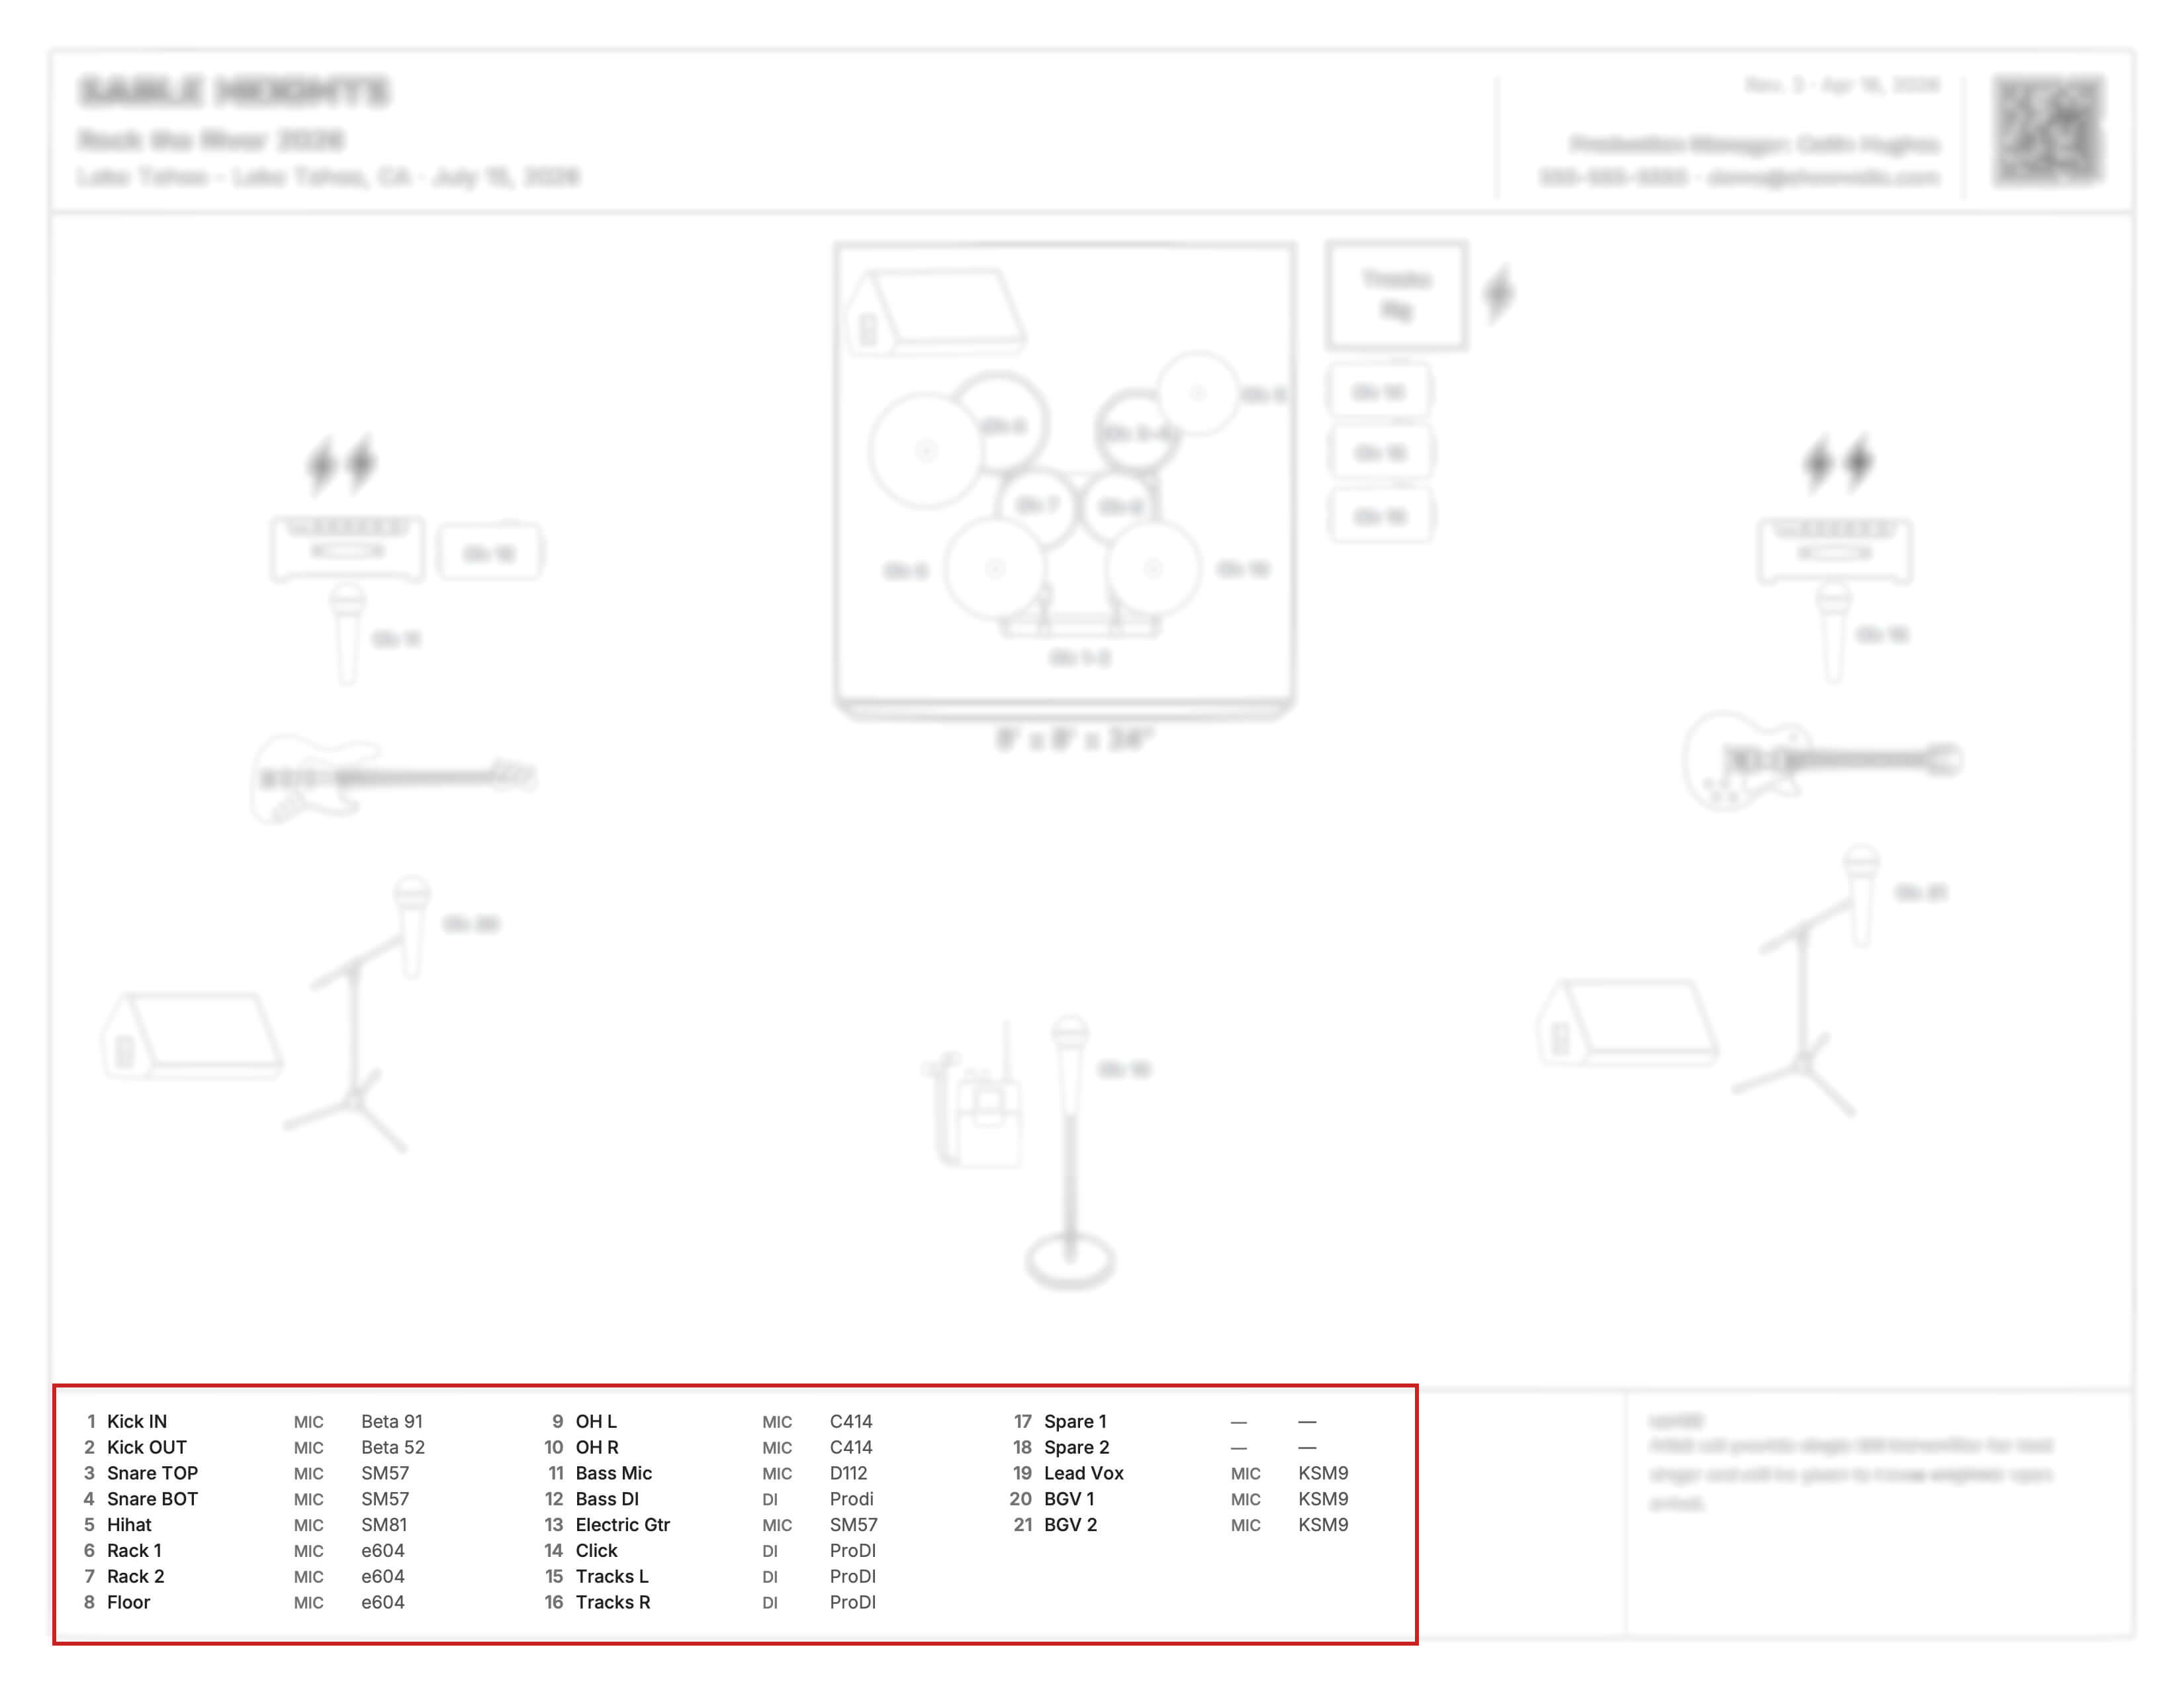
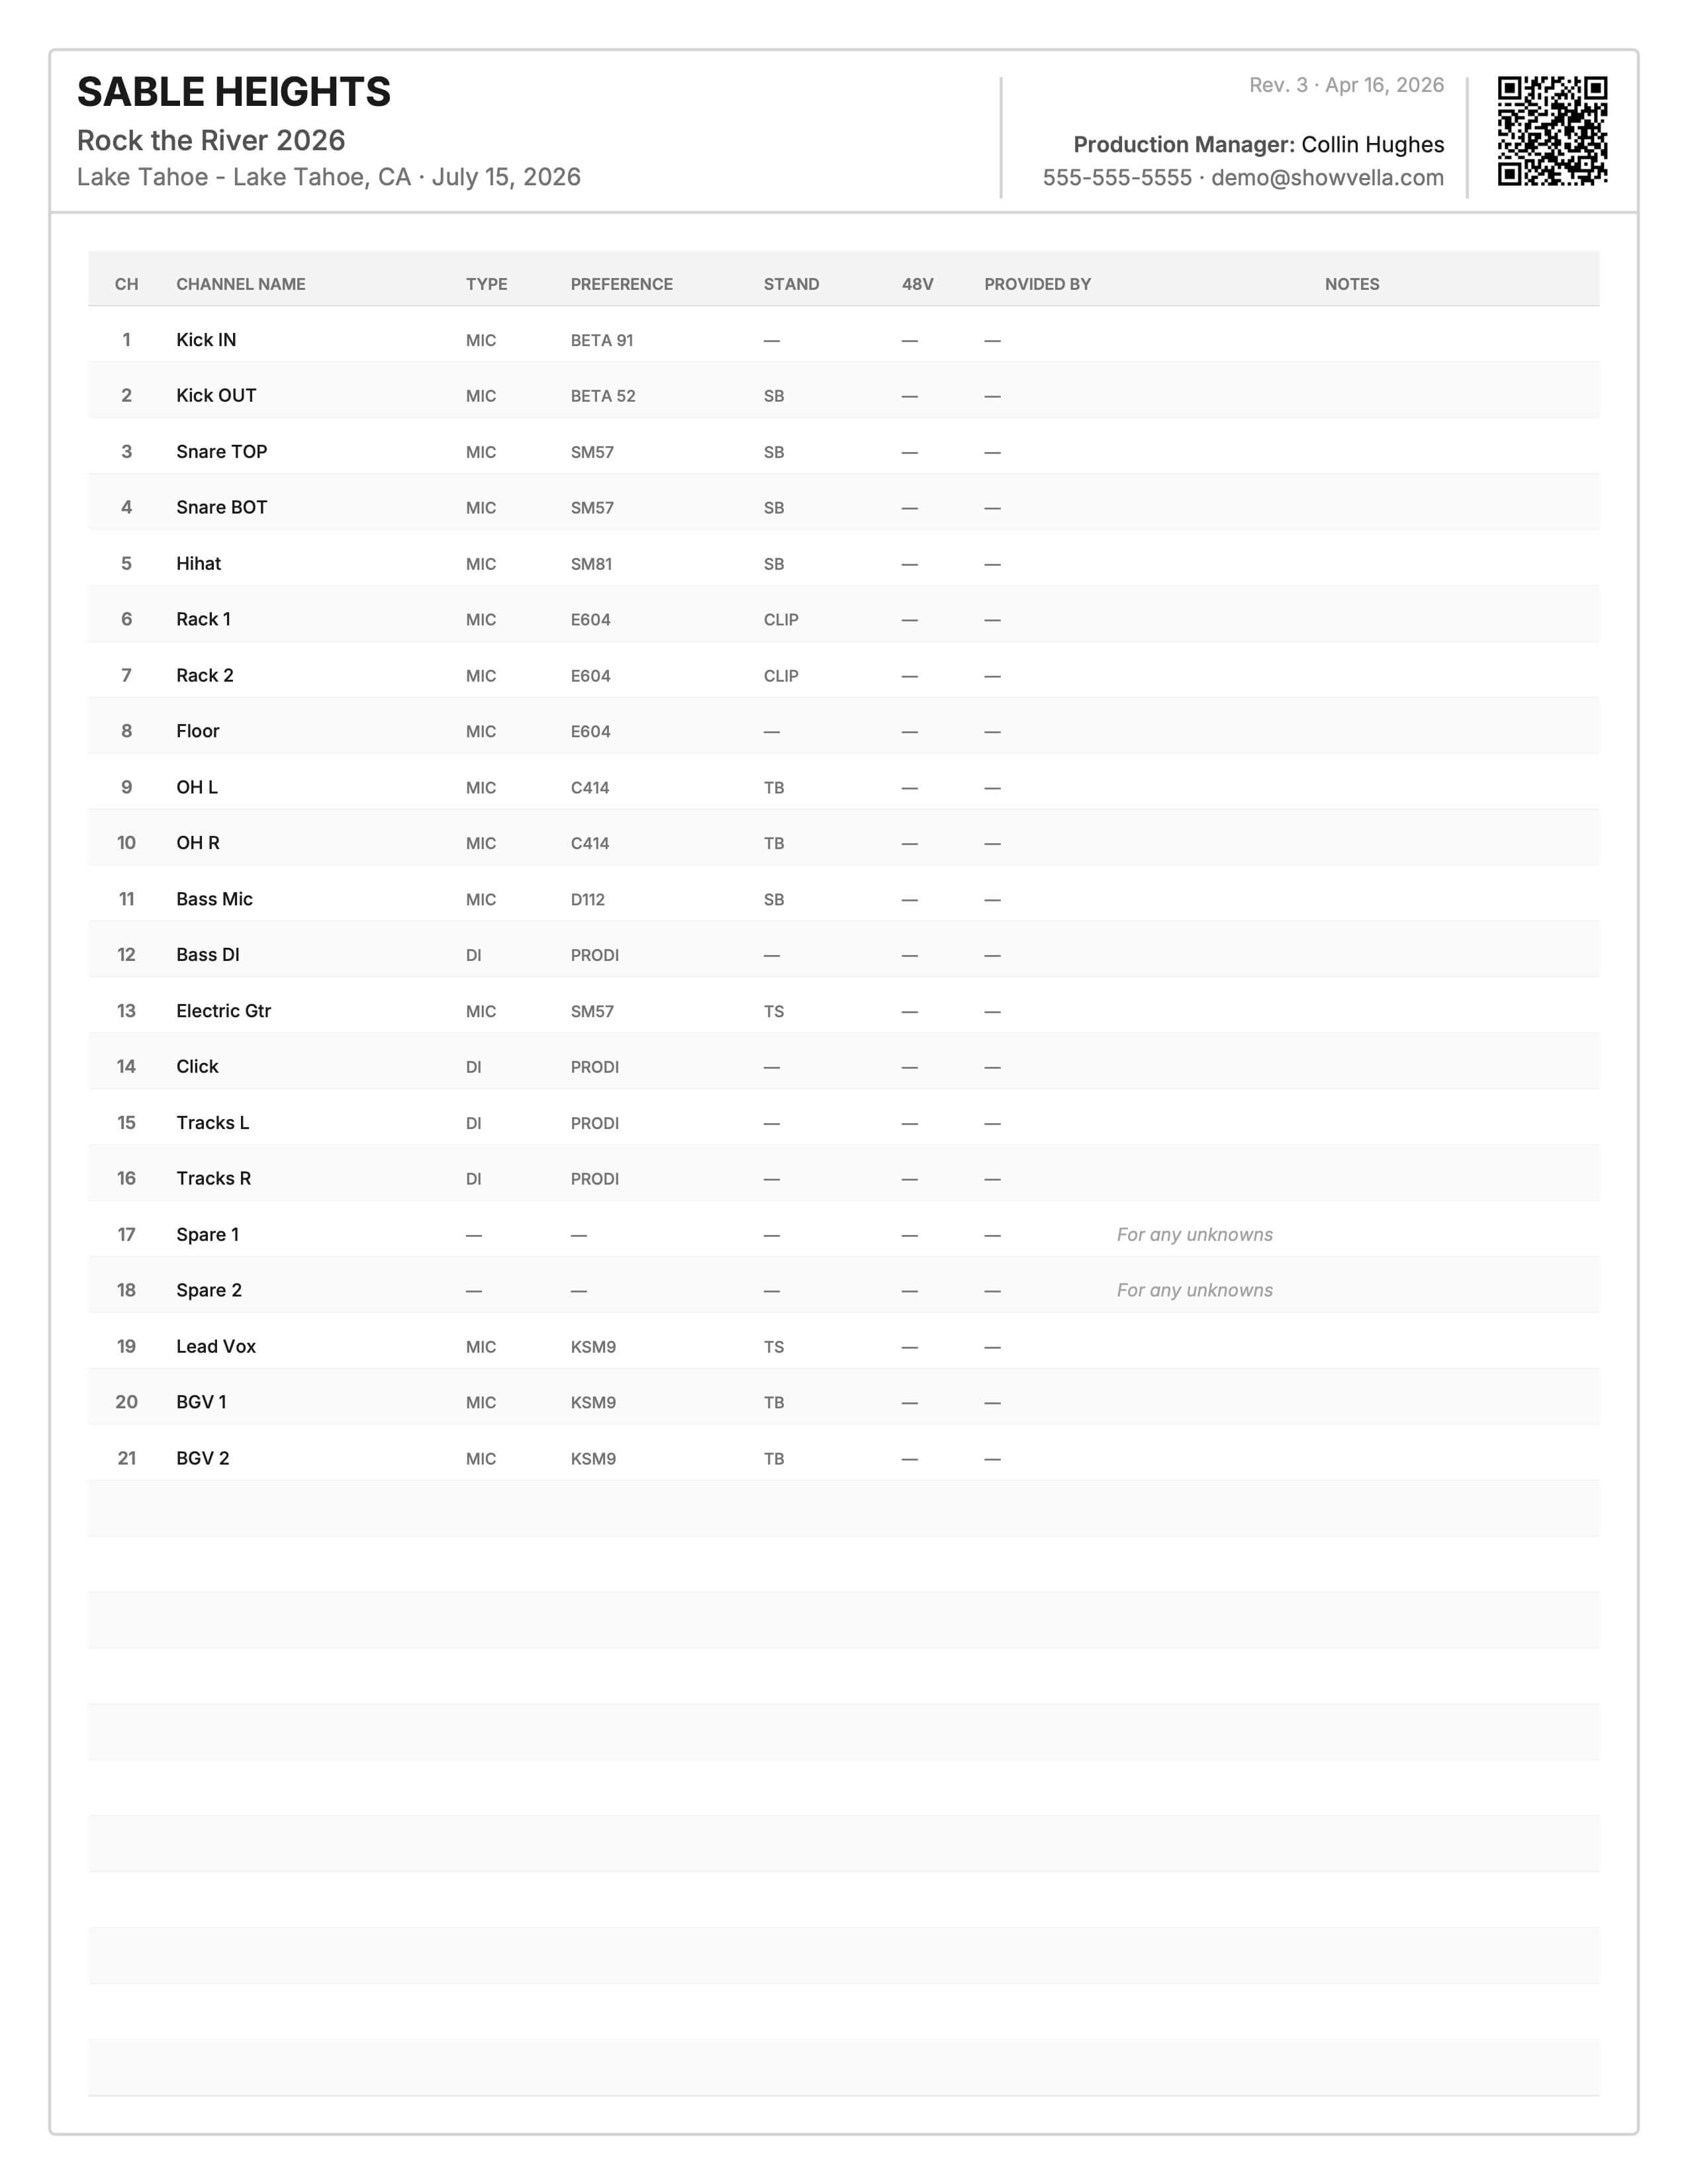
Your input list is the companion document to your stage plot, and it needs to be just as thorough. Every single source that will be mic'd or run direct into the PA or monitor system needs a channel number, a name, and a few key details.
A quick note on terminology before we go further: a DI box (direct injection box) converts an instrument-level signal — from a bass guitar, keyboard, acoustic guitar, or backing tracks system, for example — directly into the console without a microphone in front of an amp. Whether a source is getting a mic or a DI is one of the most important things your input list needs to specify for each channel.
There is an industry-standard channel ordering that engineers expect, and following it will make you immediately easier to work with. Here is an extensive list of the most common instruments in order of industry standard — choose which instruments you need and keep them in this order:
| Ch. | Input | Abbr. | Notes |
|---|---|---|---|
| 1 | Kick IN | K IN | |
| 2 | Kick OUT | K OUT | |
| 3 | Kick SUB | K SUB | |
| 4 | Snare Top | Sn T | |
| 5 | Snare Bottom | Sn B | |
| 6 | HiHat | HH | |
| 7 | Tom 1 | T1 | |
| 8 | Tom 2 | T2 | |
| 9 | Tom 3 | T3 | |
| 10 | Tom 4 | T4 | |
| 11 | Ride Cymbal | Ride | |
| 12 | Overhead Left | OH L | Usually stage right |
| 13 | Overhead Right | OH R | Usually stage left |
| 14 | Spare | Spare channels allow flexibility for unexpected needs, while grouping in 8's prevents instruments from being split across digital console banks. | |
| 15 | Spare | ||
| 16 | Spare | ||
| 17 | Bass DI | ||
| 18 | Bass Mic | ||
| 19 | Electric Guitar 1 Left | EGtr 1 L | Guitars are usually split stage left and stage right — Guitar 1 is typically stage right, Guitar 2 stage left |
| 20 | Electric Guitar 1 Right | EGtr 1 R | |
| 21 | Electric Guitar 2 Left | EGtr 2 L | |
| 22 | Electric Guitar 2 Right | EGtr 2 R | |
| 23 | Acoustic Guitar | Acu | |
| 24 | Spare | ||
| 25 | Keys 1 Left | Keys 1 L | Usually together on stage; if split, Keys 1 is typically stage right and Keys 2 stage left |
| 26 | Keys 1 Right | Keys 1 R | |
| 27 | Keys 2 Left | Keys 2 L | |
| 28 | Keys 2 Right | Keys 2 R | |
| 29 | Spare | ||
| 30 | Trumpet | Trump | These are the most common horns and strings — add or remove as needed, but keep instrument categories grouped together |
| 31 | Trombone | Bone | |
| 32 | Saxophone | Sax | |
| 33 | Violin | ||
| 34 | Viola | ||
| 35 | Cello | ||
| 36 | Misc 1 | Space for less common instrumentation | |
| 37 | Misc 2 | ||
| 38 | Misc 3 | ||
| 39 | Misc 4 | ||
| 40 | Misc 5 | ||
| 41 | Click | There are many combinations of click and cues routing — some setups use fewer channels, some use more | |
| 42 | Cues | ||
| 43 | Tracks L | Trx L | |
| 44 | Tracks R | Trx R | |
| 45 | Lead Vocal | Ld Vox | |
| 46 | Background Vocal 1 | BGV 1 | Usually ordered from downstage right to downstage left, then continuing upstage right |
| 47 | Background Vocal 2 | BGV 2 | |
| 48 | Background Vocal 3 | BGV 3 |
Want this list handy offline?
Print it out or keep it on your phone for quick reference.
Download our free PDF →A few important things to understand about this list:
You don't need all of these. This table represents a fully loaded setup — a large band with horns, strings, two keyboard rigs, two guitarists, and a full tracks system. Your actual list will be a tailored subset. If you don't have a ride mic, skip it. If you only have one guitarist, account for only one. Take what applies to you and leave the rest.
Channel counts per instrument are flexible. At bar gig level, one kick mic and one snare mic is perfectly normal and expected. At theatre level and above, two or three kick mics and a top/bottom snare becomes more common. Know the level you're playing at, be reasonable in what you request, and list what you actually expect to receive.
The Notes column in the table above is teaching you the reasoning, not just the order. Pay attention to entries like "DI always listed before mic when both are used" or "routes to monitors only — not FOH." These are the details that separate a beginner's input list from a professional one.
Spare channels are worth the effort. You can see in the table how spares are placed at natural breakpoints — after drums to fill the bank of 16, after guitars to fill the bank of 24, after keys to fill the bank of 32. This isn't accidental. Many consoles work in groups of 8, and an input list that respects that structure makes an engineer's job significantly cleaner. Don't force spares where they don't fit, but use them where they do.
For each channel, also specify:
- Is it a mic or a DI?
- If it's a mic, what stand type does it need?
- Any mic or DI preferences? If you have them, list them. If not, leave it open. You can also specify if you are bringing your own mic or DI in this column.
In Showvella, your input list is built automatically as you assign channels in the stage plot editor. Change something on the plot, it updates on the list. Change something on the list, it updates on the plot. You never have to manually sync the two documents.
There are actually two versions of the input list worth knowing about. The first is a condensed version that lives directly on the same page as your stage plot — less detail, but immediately useful for an engineer standing on stage who needs a quick reference without flipping to a separate page. If your setup is simple enough to fit, getting everything on one page is a significant advantage. The second is a dedicated full input list page with all the detail — channel numbers, stand types, mic and DI preferences, and notes. Both should always be included in what you send. Showvella generates both automatically.
Step 10: Review Both Documents Together
Once your stage plot is built and your input list is populated, look at both of them side by side and ask:
- Does the input list account for everything on the stage plot?
- Is the channel order logical and close to industry standard?
- Are the notes minimal and specific — just a few lines?
- Does everything on stage have a clear visual placement?
- Are power requirements documented?
- Is all the header info filled in — band name, venue, date, revision number, contact?
If the answer to all of those is yes, you have a solid, professional stage plot and input list. Export it as a PDF and send it.
Step 11: Keep It Updated and Share It Right
Building your stage plot is the hard part. Once it's done, maintaining it takes almost no time — but only if you stay on top of it.
Every time you have a new show, update the venue name, event name, and date. If anything about your setup changes — you added a keyboard player, you dropped a guitar rig, you switched to IEMs — update the plot, increment the revision number, and re-export. A venue that receives a PDF with their specific name and the correct show date on it immediately trusts that the information is accurate. That's the whole game.
Showvella makes this part fast. Create a new show, fill in the details, and your updated stage plot and input list are ready to share in about 30 seconds. Every document that goes out through Showvella also includes a QR code — so even if you've already sent a PDF to the venue and something changes, the engineer can scan the QR code on the original document and pull up the latest version automatically. No chasing down old emails, no version confusion, no showing up to a venue that's prepping for a setup that changed two weeks ago.
Common Stage Plot Mistakes to Avoid
Even experienced bands make these. Watch out for:
Leaving it generic. A stage plot without a venue name or date looks like it was pulled from a folder and forwarded without a second thought. Fill in the details for every show.
Forgetting monitor needs. Monitor placement is frequently missing or vague. Every person on stage should have their monitoring situation documented — wedges, IEMs, or "no monitor needed."
Skipping power requirements. Leaving power off means the crew is figuring out your needs on the fly, often after your gear is already positioned. Document it.
Wrong or missing stand types. Listing "mic stand" without specifying boom, straight, clip, or none creates extra work for the crew and potential delays at soundcheck.
Letting it go out of date. A stage plot from eight months ago that still lists a band member who left is worse than no stage plot at all. Every show should go out with accurate, current information.
Cramming too much into the notes. If your notes run longer than three or four lines, your plot probably isn't clear enough on its own. Move information into the visual layout wherever possible.
Not including contact info. If an engineer has a question at 7am the day of your show, they need to reach someone. Don't make them hunt for it.
Mismatched stage plot and input list. If a source appears on the stage plot but has no corresponding channel on the input list — or vice versa — you'll create confusion on show day. Always review them together before sending.
Sending the wrong file format. Always send a PDF. A JPG or PNG is often too low-resolution to be readable when printed. An editable file is a liability. PDF only, every time.
What About the Tech Rider?
A tech rider is a separate document from your stage plot, and it's worth knowing the difference — because they serve very different purposes.
Your stage plot and input list answer one question: what does the stage look like, and what do we need to plug in? They are visual, specific, and tied to a particular show.
A tech rider is a broader technical requirements document that covers things like PA system specifications (line arrays vs. point source, minimum system wattage), console requirements, backline rental specs if applicable, load-in and soundcheck time requirements, and other technical expectations that apply to every show you play. Think of it as the terms your production sets with any venue before they ever see your stage plot.
Here's something most bands overlook: your tech rider should carry the same show and venue information as your stage plot — the artist name, venue, event name, date, and point of contact. Most people don't bother, but the philosophy at Showvella is that it matters. When a promoter, venue, or production manager receives a tech rider with their specific information on it, it signals immediately that the document is current, prepared for them specifically, and worth trusting. That trust is built before anyone even reads the first line of technical requirements. And just like your stage plot, that means you have to actually keep it updated — a tech rider with the wrong venue name on it does the opposite of what you want.
In short: the tech rider sets the terms, the stage plot shows the details. Both documents should carry your show information, and both need to be kept current. Showvella handles the stage plot and input list — a full tech rider builder is on the way to complete the picture.
That's the real goal of all of this: a document that makes everyone's job easier. Faster load-ins, smoother soundchecks, fewer surprises, and a reputation as an act that genuinely has their stuff together. Before you send anything, run it through the three C's — is it comprehensive, is it clear, is it clean? If the answer to all three is yes, you're ready. It all starts with a great stage plot. Start building yours at Showvella.com.
Casey Sharp
Cofounder of Showvella
Casey is cofounder of Showvella, built to bring structure and consistency to show advancing.